Hihi 

Our mission is straightforward: we want an advanced hassle-free solution to reverse Android applications, especially malware. We need a tool that integrates decompilation, decryption, dynamic debugging, and vulnerability detection. Lastly, this tool needs to quickly identify common and obscure Indicators of Compromise (IOCs) with high fidelity.
With these goals in mind, we’ve developed Incinerator 
Within the Incinerator application, you’ll be able to decompile Android applications, leverage advanced automatic content decryption, cancel reflection API calls, be provided with clean deobfuscated code, and have real-time debugging support for analysis on real devices in real-time. It’s the perfect solution for anyone who wants to explore, analyze, and reverse Android malware without being experienced.
Under-the-hood Incinerator conducts a variety of analyses, including component analysis, security vulnerability detection, static and dynamic code analysis, vulnerability mining, and malicious code analysis. Through comprehensive examination, Incinerator can also effectively be used to identify and resolves security risks and vulnerabilities.
At a high-level; decryption tasks are handled in the cloud, where an in-house vulnerability analysis engine sandbox continuously updates the vulnerability library in real-time. It can pinpoint malicious code or vulnerabilities down to specific lines.
At the time of writing, the easiest way to get early access to Incinerator is by joining our Discord (https://discord.gg/wxJMRm8Hyg) and reading the faq-readme section. To stay up to date with releases and developments follow H4k and Boschko on Twitter.
Many versions ago Incinerator was benchmarked against JEB or GDA and performed quite well. I would highly recommend viewing the full report HERE.
Additionally, a comparative analysis comparing the malicious code detection and analysis capabilities of various threat intelligence centers and online sandboxes was performed to benchmark Incinerators capabilities. Again, it performed extremely well and the report is available for reference HERE.


Let’s talk about the company behind Incinerator. It’s developed by a skilled team of ~12 engineers over at Lian Security and has been in development for about two years. They’re the developers behind other products such as SHAMBLES, INCINERATOR, and FLEGIAS covering everything from software, infrastructure, hardware, basic operations and maintenance, product UI design, and so on.

Kindly note, and be mindful that Lian Security is a company based in China, along with everything that it entails. The people behind their products are talented security professionals just like the rest of us. Most of them have worked at F100 and extremely respected information security and research companies. I personally believe it would be a shame to deprive ourselves of their talent, research, hard work, and dedication to a framework based off of regional biases.
As a disclaimer, it’s important to mention that at the time of writing, I maintain an informal/unofficial affiliation & relationship with Lian Security, the company behind Incinerator. This connection can be best described as a healthy blend of friendship and business partnership. Our mutual goal is to pave the way for a future where Incinerator becomes accessible to a broader audience. We strive to improve and help redefine the landscape of Android malware investigations, deobfuscation, and reverse engineering by simplifying the entire process in one tool.
Incinerator is available on Windows, MacOS, and Linux systems. The application ingests both APK and DEX files. APK file includes compiled code files (.dex files), file resources, certificates, and manifest files. DEX files are an executable file of the Android system, containing all the operating instructions and runtime data of the application.
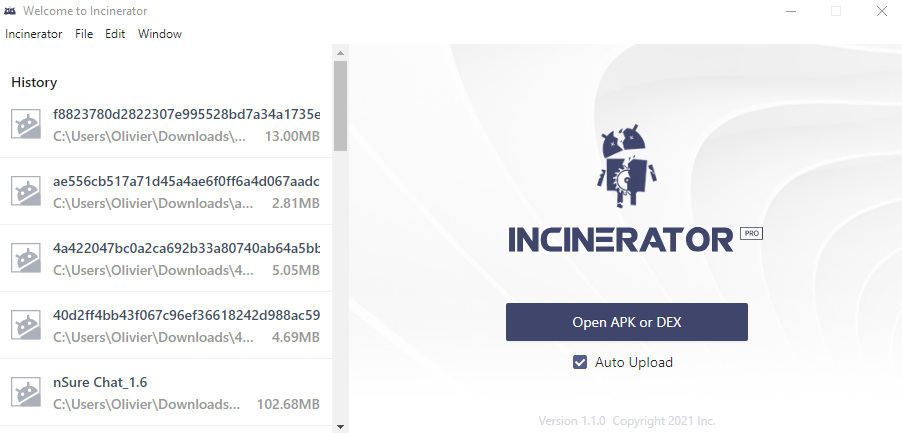
There are two ways of getting files analyzed, the first is through the Incinerator’s desktop application interface seen below.

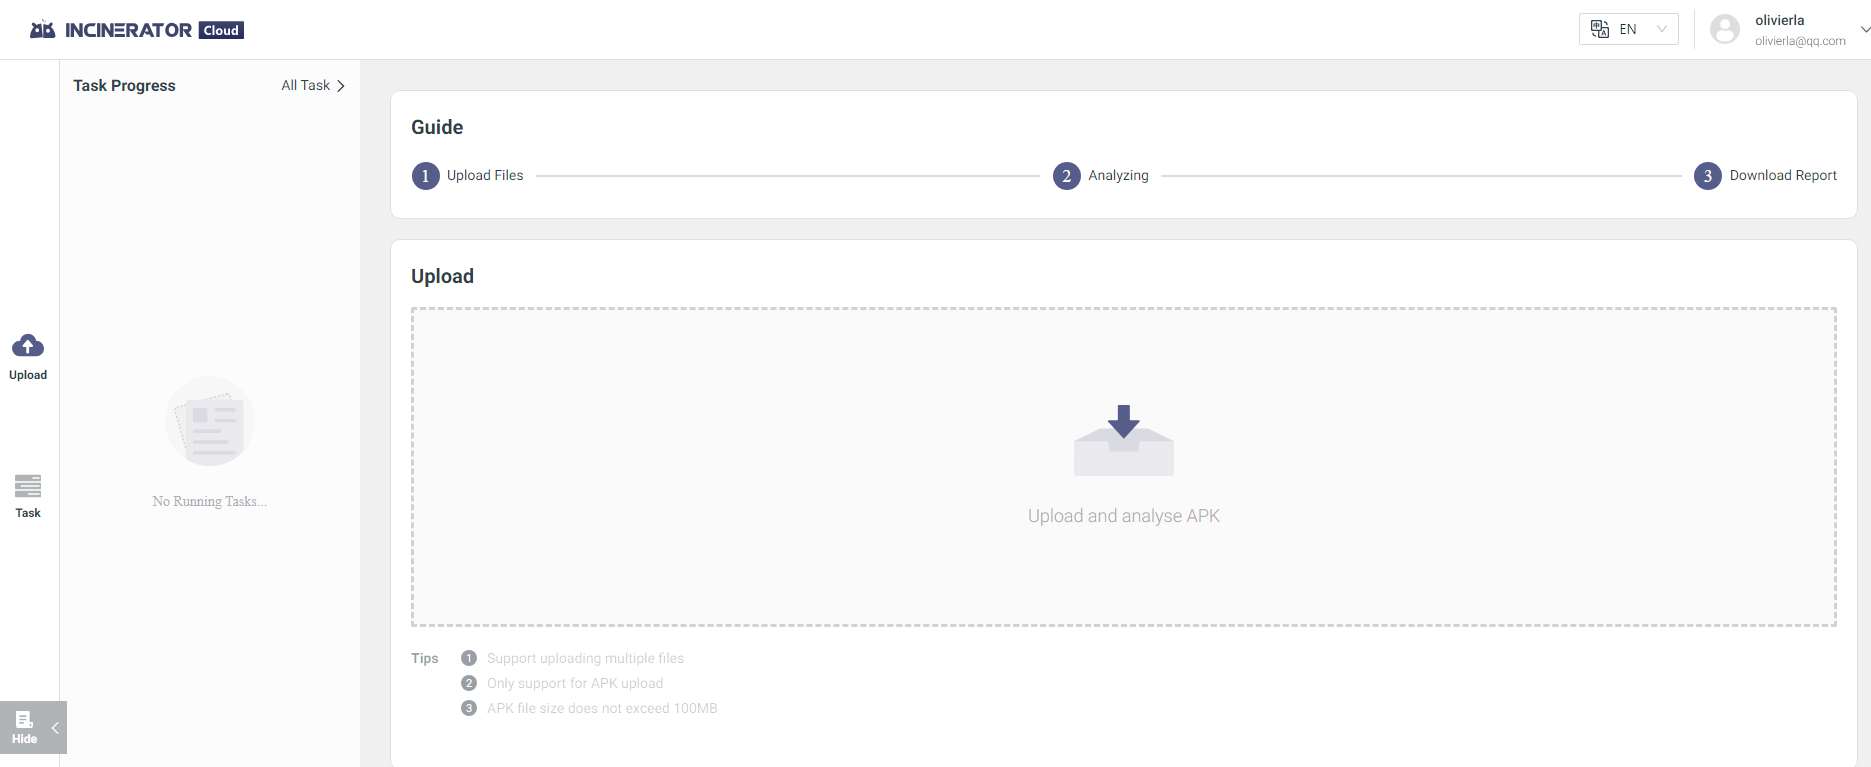
The second is through the cloud web-based portal.

There’s no real benefit to using one over the other, it’s all personal preference. I’ve personally always uploaded and opened my APKs through the desktop application. Once uploaded, you can log in to the cloud portal and view uploaded samples at https://incinerator.cloud/#/main/task/list.

From the web portal, you can view the processed the generated web-based reports. These reports can be shared for others to analyze the APK. This access has to be configured in your UCENTER account and is Not Public by default.

If you want to follow along or explore the report click HERE which will bring you to the report seen below.

The ML models have really high fidelity. Some aspects of Incinerator are actually open-source and can be found on Lian Security’s Github. Two of the models used to ingest and generate report data have been made public.
- android-malware-detection
- apk-obfucation-detection
There is A LOT of information in both the Base Info and Behavior Info panels as well as the Static Analysis, Dynamic Analysism, and APK Risk side panels. The goal is to provide a Bill Of Materials (BOM) which gets derived from package managers, binary files, source code, and container pictures.
Let’s look at some features I personally enjoy. You can download the network traffic of the APK and ingest it into Wireshark.

Information such as Application Permissions which like a lot of the panels are derived from the analysis of androidmanifest.xml , and much, much more.

A good section to quickly glance at is the Software Composition Analysis (SCA) portion of the report, as seen in the image below it’s pretty obvious that most of this information is of value.

I invite you to explore the report for yourself. I won’t be coming back to this portal as everything seen in the web portal is baked into the main application.
Once a sample is fully analyzed by the cloud engine we can begin analyzing it within the Incinerator application. When you first load the sample the APK Report will load which looks quite similar to what’s seen in the web portal report.

As mentioned previously, Incinerator is a sandbox used to record the entire execution process of the application in the form of a call stack. When the user opens the corresponding sample locally, we can provide a dynamic debugging-like experience. This allows users to understand how the behavior of the sample is triggered after dynamic execution.

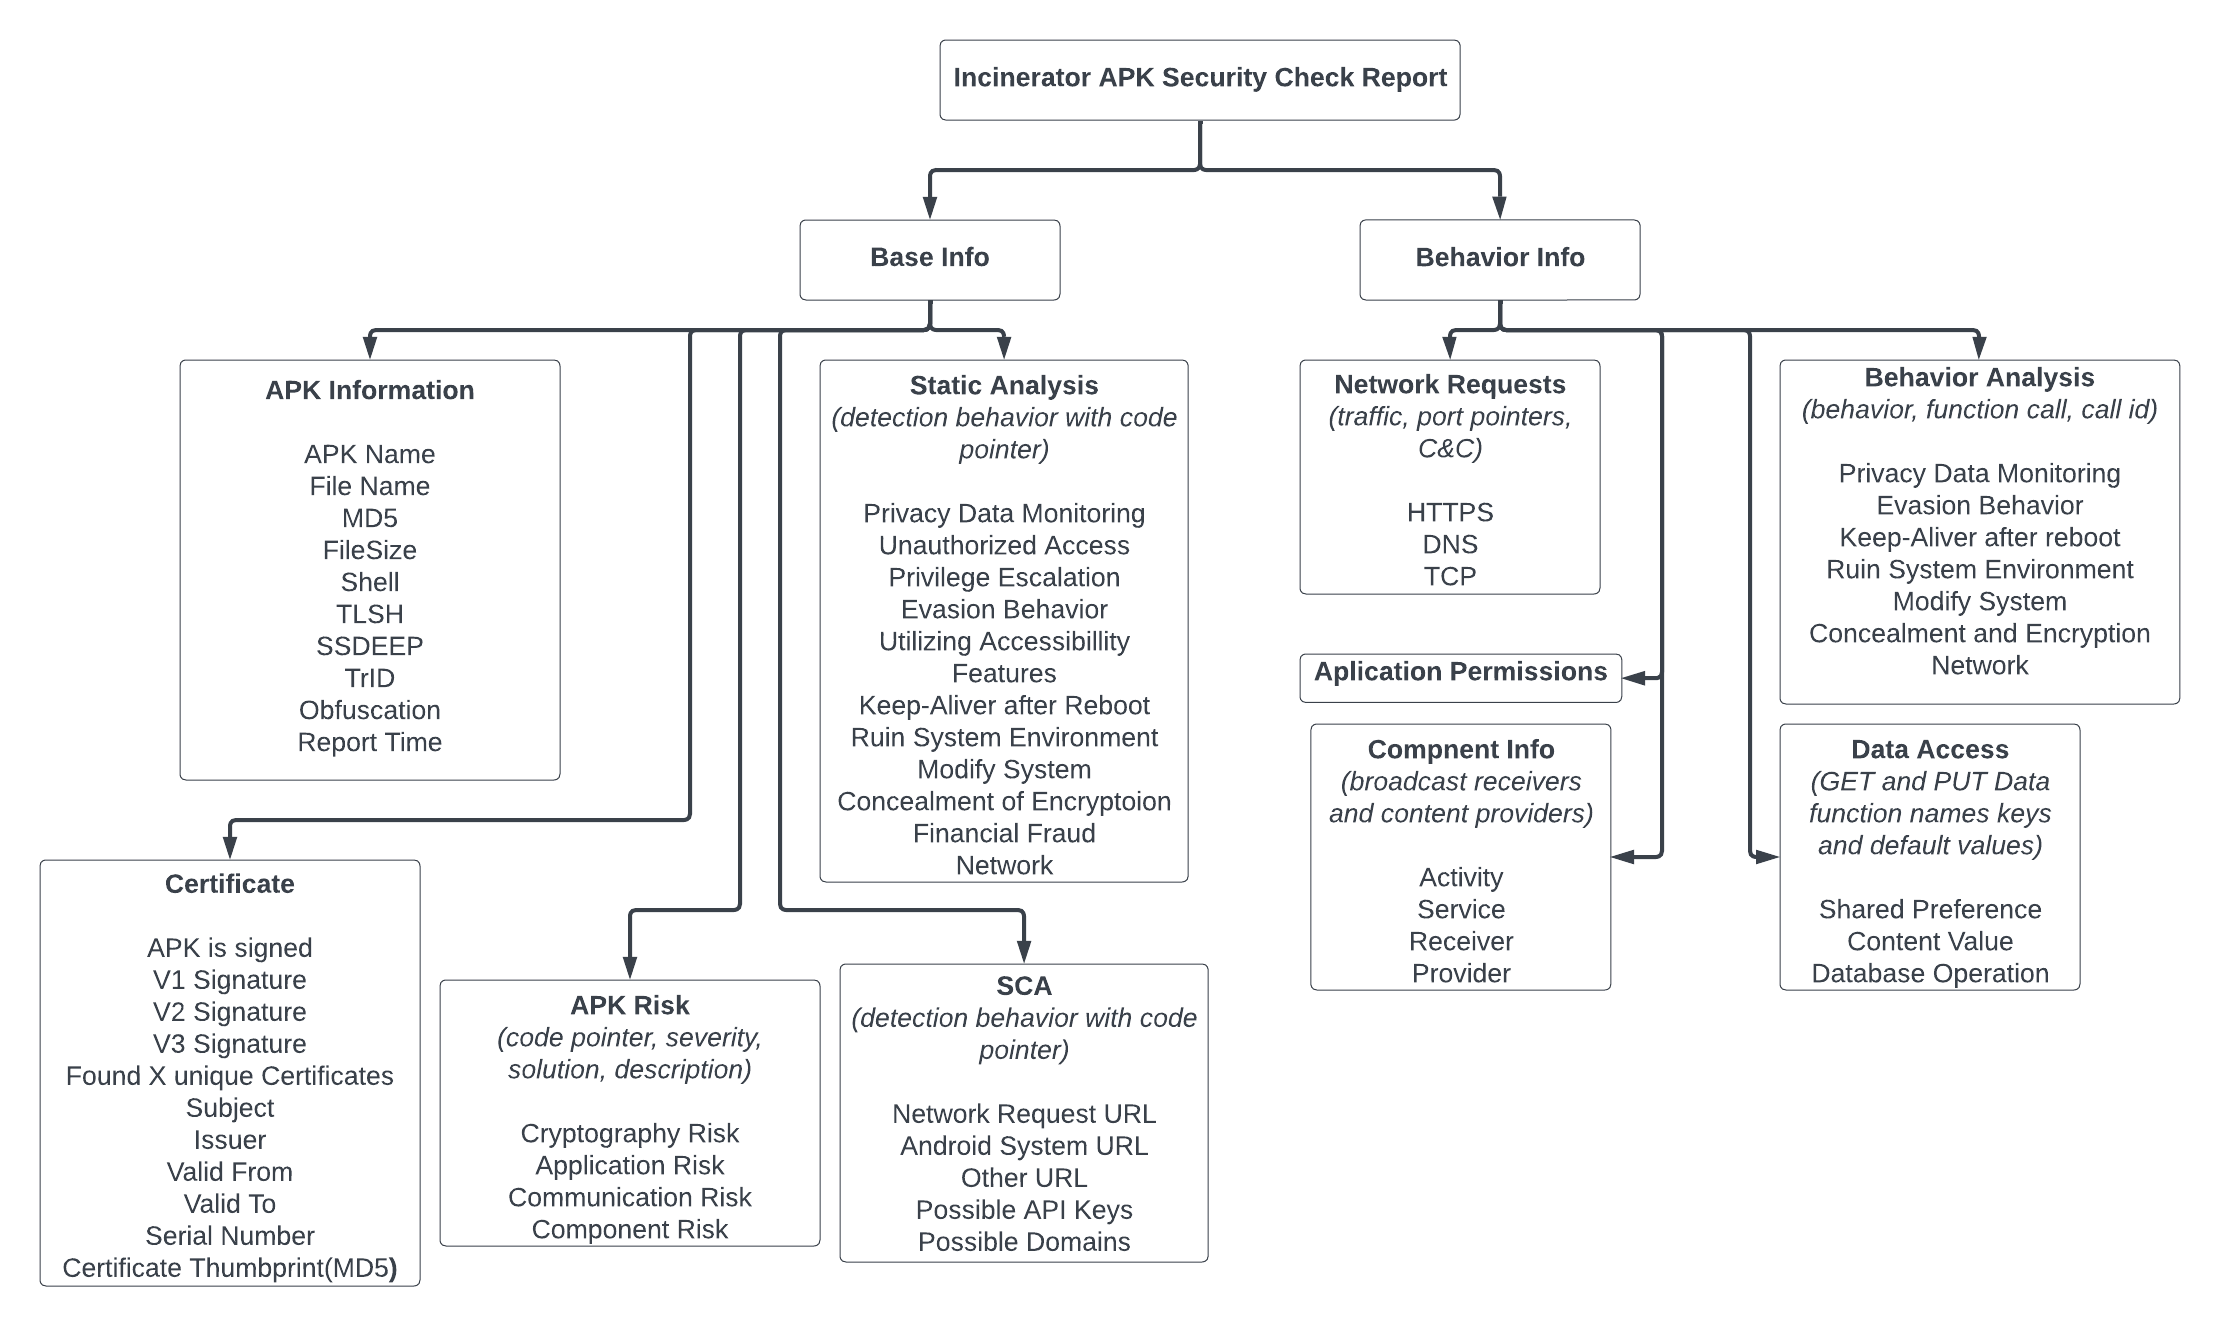
There are two main sections Base Info and the Behavior info the main differences and information you can expect to obtain from each panel are as described below. This is commonly what you’ll see but it isn’t a comprehensive list.

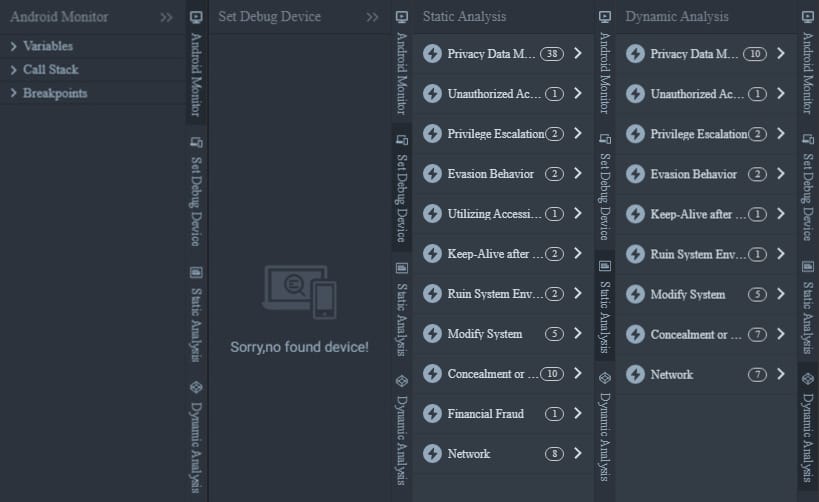
On the right-hand side we have four panels Android Monitor, Set Debug Device, Static Analysis, and Dynamic Analysis we’ll dive into these later.

Here is the basic breakdown of the UI.

Let’s start reversing some malware! Let’s look at FakeCalls. One of the main goals of reversing malware is to identify the C2 and C&C channels that are used by attackers to steal and exfiltrate data. What’s awesome about Incinerator is how effective it is at identifying C2s and C&C channels.

As seen in the picture above we know this malware is using dead drop resolvers (T1102.001). The use of a dead drop resolver is a technique where malicious content is stored on legitimate web services which is then called and installed onto the victim. Oftentimes this will be additional domains and IP addresses used to proxy and disguise the communication from the real C&C servers.
Let’s look at another variation of this malware using the curl information retrieved in the checkpoint report and manually reverse the behavior in Incinerator. The Incinerator engine identified code that performs a request to a C2 server daebak222.com/huhu/admin.txt as seen below.

A curl on the endpoint would have provided the following output.
$ curl https://www.daebak222.com/huhu/admin.txt

{
"a01": "eWVlYWIrPj5mZmY_dXB0c3B6IyMjP3J-fA==",
"b05": "Y2ViYWIrPj4gICI_IyAjPykpPyAlKSspIiMjPn14Z3Q=",
"a07": "eWVlYWIrPj4gKSM_ICc_JSM_ICkrJCEkJD55ZHlkPnB1fHh_P2VpZQ=="
}
Our goal is to understand why the malware fetches this information, and its purpose. As we’ll find out, it’s used to update its C2 channel. The entire call stack for this detection points to ServerInfoService.java which calls Service and Binder Android classes that are typically used when you need a service to fetch server information using HTTP requests. It also provides methods for other components to access this information.
A ServerInfo class contains information about the server.
a01 (eWVlYWIrPj5mZmY_dXB0c3B6IyMjP3J-fA==),
b05 (Y2ViYWIrPj4gICI_IyAjPykpPyAlKSspIiMjPn14Z3Q=),
a07 (eWVlYWIrPj4gKSM_ICc_JSM_ICkrJCEkJD55ZHlkPnB1fHh_P2VpZQ==)
Representing the different properties expected to be obtained from the server.

Where serverInfo.a01 will represent the new server, serverInfo.b05 will represents an alternate server, and serverInfo.a07 represents the server from which to fetch the information. The fetch() and fetchFromAlternative() method initiates HTTP requests to fetch server information.

If we hit tab within fetch() in the Incinerator console, we can see the intermediate language of Android application bytecode also known as “smali” code where we can clearly see that eWVlYWIrPj5mZmY_dXB0c3B6IyMjP3J-fD55ZHlkPnB1fHh_P2VpZQ== is in fact daebak222.com/huhu/admin.txt. Just below this we have the onData method that logs a success message if server info is fetched successfully. Then, it checks if any of the fields (a01, b05, a07) of the ServerInfo object are empty. If any of them are empty, it logs a warning message indicating invalid server info. Otherwise, it calls the updateServerInfo method of the ServerInfoService class, passing the received ServerInfo object for updating server information.

Cool! That was easy to figure out (thanks to Incinerator). Moving on, it’s time to look at Incinerator’s detection capabilities. Incinerator identified that the malware is able to capture SMS messages received by the device, send new SMS messages, and makes calls to phone numbers specified by commands launched from the C2.

Let’s confirm if the malware has the ability to to capture phone calls, text messages, and much more on the compromised device. The first logical step is to see if the malware checks for or assigns itself the privileges to even obtain such information in the first place. As seen below, it’s got a ton.

How does it go about obtaining these? We can double-click on any call stack parameter to open the respective code. Of interest, we will look at the event Add New Device Administrator.

The malware checks to see if the administrator is active, if it’s not it initiates an action to request the device admin permission using an Intent with the action android.app.action.ADD_DEVICE_ADMIN. As long as the user does not give in, it’ll keep requesting by looping the window.


Once the user has given the permission, IIRC the only way to deactivate it manually in the Settings -> Security -> Device Management application, but by that time it’s already too late.
The following is a non-exhaustive list of permissions requested/obtained:
permissionNames.add("READ CONTACTS");
permissionNames.add("WRITE CONTACTS");
permissionNames.add("READ SMS");
permissionNames.add("RECEIVE SMS");
permissionNames.add("SEND SMS");
permissionNames.add("RECORD AUDIO");
permissionNames.add("READ PHONE STATE");
permissionNames.add("WRITE EXTERNAL STORAGE");
permissionNames.add("READ EXTERNAL STORAGE");
permissionNames.add("CHANGE WIFI STATE");
permissionNames.add("INTERNET");
permissionNames.add("ACCESS WIFI STATE");
permissionNames.add("GET ACCOUNTS");
permissionNames.add("READ LOGS");
permissionNames.add("PROCESS OUTGOING CALLS");
permissionNames.add("CALL PHONE");
permissionNames.add("RECEIVE BOOT COMPLETED");
permissionNames.add("DISABLE KEYGUARD");
permissionNames.add("INSTALL SHORTCUT");
permissionNames.add("UNINSTALL SHORTCUT");
permissionNames.add("WAKE LOCK");
permissionNames.add("CHANGE WIFI STATE");
permissionNames.add("INTERNET");
permissionNames.add("ACCESS WIFI STATE");
permissionNames.add("GET ACCOUNTS");
permissionNames.add("READ LOGS");
permissionNames.add("PROCESS OUTGOING CALLS");
permissionNames.add("CALL PHONE");
permissionNames.add("RECEIVE BOOT COMPLETED");
permissionNames.add("DISABLE KEYGUARD");
permissionNames.add("INSTALL SHORTCUT");
permissionNames.add("UNINSTALL SHORTCUT");
permissionNames.add("WAKE LOCK");
So we know the malware has the permission it needs to do bad stuff. Going back to the detection call stack we can observe multiple detections for code that identifies the device’s microphone as an audio source and stores the recordings in a predetermined location on the disk. Therefore the malware is able to record audio calls.

The malware also retrieves SMS messages by querying content://sms/ to obtain the Sender ID and Address, Body/Content, Read status, Data received, andType information from the compromised device and sends it back to the C2 in a zip.

The malware is also capable of intercepting incoming SMS messages on the device, transmitting new SMS messages, and placing calls to phone numbers designated by the C2 server.

In typical fashion, it obtains device information zips it, and sends it off.

This malware also checks for Facebook credentials which are oddly the only credentials it’ll try and obtain.

There is also a long and funky package manager class. This class will retrieve the information about all installed packages on the victim’s phone such as VersionCode, VersionName, PackageName and AppName this information is likely used for an overlay attack. This is an attack where the malware opens an active window over a legitimate program.

As seen below there is a strong chance this is happening. The opened malicious window is the same as the legitimate program. With such attacks, malware can steal the victim’s credential data such as payment data or login data.

The malware also fetches the geolocation of the device using services like api.ipify.org when launched. This also allows it to retrieve public IPv4 and IPv6 addresses, MAC addresses, and the WIFI SSID.

It’ll also run OS commands mainly to retrieve additional system information from /proc/cpuinfo


There is honestly so much more, but I think I’ve done a fair job glossing over the basics. The point of this blog isn’t to reverse malware, it’s to shine light on Incinerator’s capabilities and provide an overview and demonstrations. Moving on to the debugger 
There are two ways we can use the debugger. The first is by connecting your physical android phone to your PC, and the second is with a VM. It all comes down to personal preference. But I’m assuming not many of us have a rooted phone dedicated to installing sketchy malware.
The only two configurations you need to set are in Developer options and are “USB Debugging = True” and “Default USB configurations = Transferring Files“. If you’re in a VM you can simply use scrcpy to access the android and enable it.

I have not tested this but I don’t see why you couldn’t also simply configure all this through the following ADB commands (I might be missing one or two commands).
adb shell settings put global development_settings_enabled 1
adb shell setprop persist.security.adbinput 1
adb shell settings put global adb_enabled 1
adb shell settings put global adb_usb_debugging 1
adb shell settings put global adb_usb_tethering 1
Regardless, I don’t care how you do it, but I have faith that you’ll figure it out. Once our phone is connected to the computer or we’ve ADB connected to a VM we’ll see the following mount within Incinerators “Android Monitor” tab.

All we have to do is double-click on it and the APK will be uploaded to the phone and will spawn attached to the incinerator debugger.

You can set your brake points, step over/into, patch data… everything a top-of-the-line debugger can do.

Again, I hope it goes without saying that you can run all this through a proxy like Caido or BurpSuite. This is honestly an amazing tool for android based CTFs.

Now this rarely ever happens but the debugger might fail (especially if you’re loading some weird CTF challenge). If you try to start the debugger a few times and it keeps failing it’s likely an issue with your pre-existing ADB environment or your phone. Below is a screenshot of what it looks like when the debugger fails.

Here are the steps you should follow to manually debug.

Step 1: You’re going to start the component of the app you are trying to debug. In the example below we want to debug com.lian.logindemo so we’ll launch it with debug logging enabled.
adb -s 10.40.43.88:5555 shell am start -D com.lian.logindemo/com.lian.logindemo.ui.login.LoginActivityIf you get an error here, I’m sorry but your device is the problem.
Step 2: We’re going to want to retrieve the list of currently running processes on the device.
adb -s 10.40.43.88:5555 shell "ps |grep com.lian.logindemo"If you don’t get any output, it means that the APK launch failed. Keep in mind that some systems require ps with -A option to list all processes.
Step 3: We’ll want to enable remote debugging on the specific APK. To do this we will set up port forwarding allowing communication between a JDWP debugger on our host machine and the specified APK running on the device.
adb -s 10.40.43.88:5555 forward tcp:12345 jdwp:<apk_pid>If there is an error running this command either the process is not running or the port has already been taken.
Step 4: Now we want to get JDB to connect to the JVM running on the local machine (127.0.0.1) at port 12345 for debugging purposes.
jdb -connect com.sun.jdi.SocketAttach:hostname=127.0.0.1,port=12345If you get any errors… do the following substeps.
Step 4-1: find all processes that are utilizing port 5037 (adb-server) on your computer, and kill them. For example, android studio can use adb-server in your. To view this run netstat -ano | findstr 5037.
Step 4-2: check forwarding status with adb forward --list.
Step 4-3: check for the existence of the debugable PID by running the following command adb jdwp.
Step 5: check classes in the JDB terminal by running classes if that command can list all the classes, then you should be 100% good to go and re-run the debugger!
If you want to see further Incinerator usage the Lian Security team released their analysis of the BOOMSLANG malware which you can go read HERE and NEXUS trojan which you can go read HERE.
If you want to read Android research published by the Lian Security team I would recommend the following articles:
- AndroidManifest.xml Evasion Techniques for Bypassing Static Analysis: Circumventing via Zip Format Manipulation
- Machine Learning-based Android Malicious App Identification
- Technical Analysis of Multi-layered Obfuscation Techniques in AndroidManifest.xml Aimed at Evading Static Analysis
- Implementation of obfuscation detection by Text Classification
Summary:
You’ve made it to the end! 
The finalized pricing model will eventually be announced. So get your hands on it while you still can! If you have questions or want to learn more about the tool send us a message on Discord or to me directly on Twitter and I’ll pass on your questions or concerns.
Thank you for reading!
Source: Original Post
