A supply chain attack is a prominent “Initial Access” tactic employed by malware authors and Advanced Persistent Threat (APT) groups to gain a foothold on their targeted hosts or systems. This method involves compromising a third-party service or software that is trusted by the target, thereby injecting malicious code into legitimate software updates or distributions.
This incident underscores the critical importance of securing the software supply chain, as even trusted software can become a vector for sophisticated cyber attacks if it is compromised at any point in its distribution or update process.
In February 2024, S2W researchers and Ahnlab Security Intelligence Center (ASEC) reported a notable campaign conducted by the Kimsuky group. This APT group exploited supply chain vulnerabilities in various software solutions, specifically targeting TrustPKI and NX_PRNMAN. The compromised software packages were embedded with malicious payloads, including the GoBear backdoor. These embedded malware components enabled the attackers to infiltrate and compromise targeted hosts, facilitating unauthorized access and control.
In May 2024, Symantec released a blog uncovering a Linux version of the GoBear backdoor, which they named Linux.Gomir. This Linux variant shares several similarities in terms of code and behavior with its predecessors.
In this blog, the Splunk Threat Research Team provides an analysis of Linux.Gomir to help security analysts, blue teamers and Splunk customers defend against this threat. Below, we will review associated Tactics, Techniques and Procedures (TTPs); Atomic Tests you can use to simulate Linux.Gomir behaviors; and security content you can use to help detect this threat.
Linux.Gomir TTPs
Non-Standard Encoding (T1132.002)
Linux.Gomir generates a unique beacon or infection ID for the compromised host, which it then sends to its Command and Control (C2) server. This beacon ID is created by taking the first 10 characters of the MD5 hash derived from the username and hostname of the infected host. The beacon or infection ID is crucial for the attackers to uniquely identify and manage the compromised machines within their network. Figure 01 shows screenshots of the code that retrieves the username and hostname to generate this beacon ID.
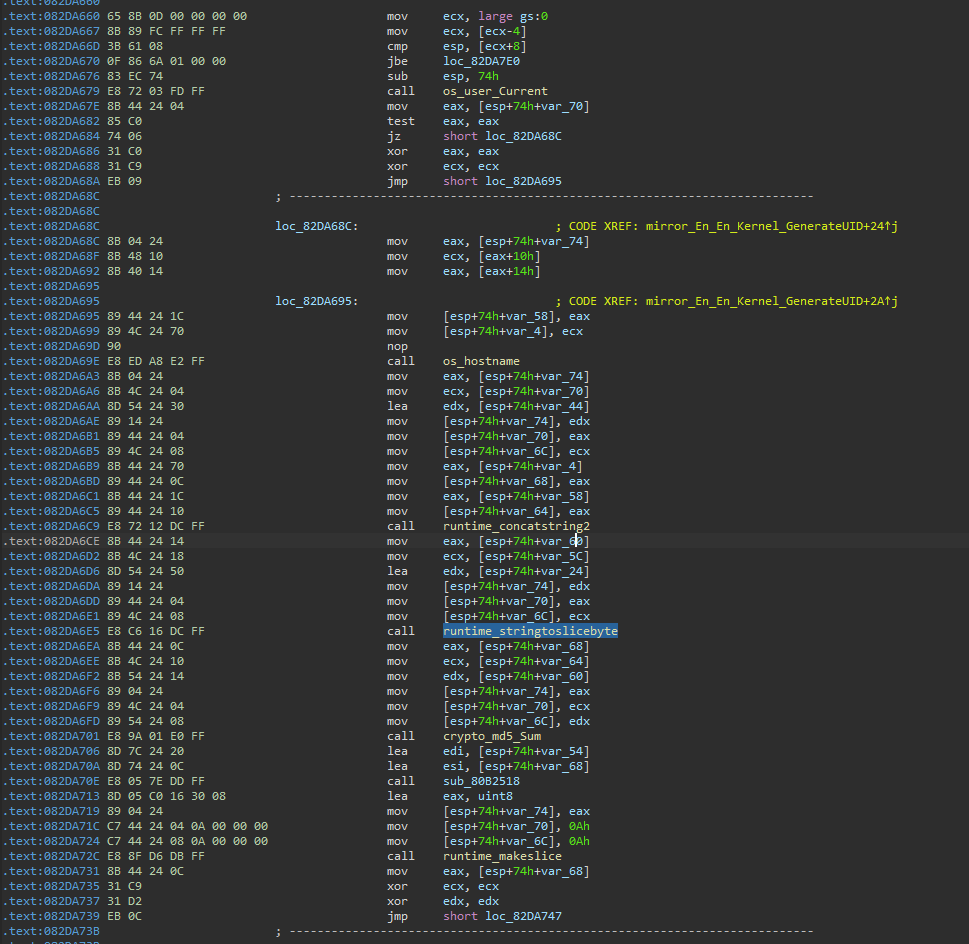
Figure 01: Generate Beacon ID
Figure 02 illustrates a simple HTTP POST network traffic instance of this backdoor malware as it communicates with its C2 server to request a backdoor command. The HTTP POST request contains a body that includes the infection ID generated on the compromised host. This infection ID allows the C2 server to uniquely identify and interact with the specific infected machine, ensuring precise command execution.
Below is the structure of the HTTP POST request body:
a><random_generated_string>=2&b<random_generated_string>=g-<beacon_id>1&c<random_generated_string>=
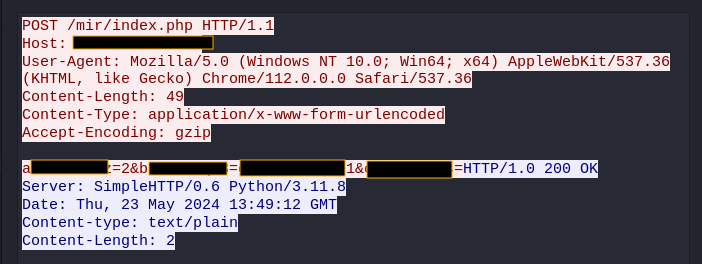
Figure 02: HTTP POST Request Body
Scheduled Task/Job: Cron (T1053.003)
Linux.Gomir includes a parameter named ‘Install.’ When this parameter is used, the embedded malware component executes its full range of malicious functions. These functions include generating an infection ID, dropping a copy of itself, persistence, installing services, and enabling its backdoor capabilities. The service installation and backdoor capabilities facilitate ongoing control and exploitation of the infected system.
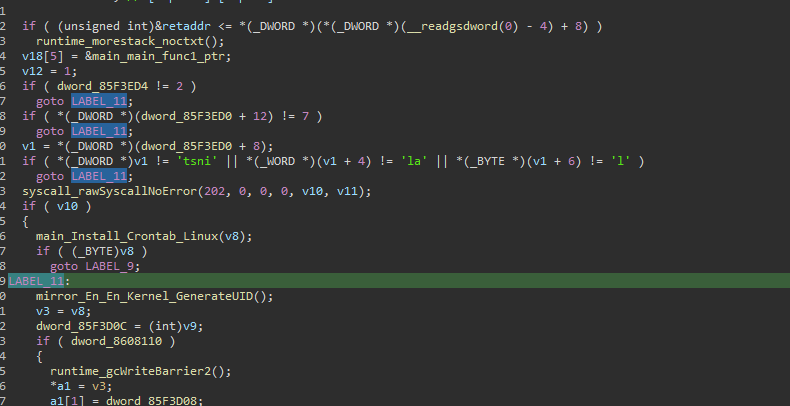
Figure 03: “Install” Parameter
Figure 04 illustrates the code snippet demonstrating how Linux.Gomir sets up a crontab entry as part of its persistence mechanism.
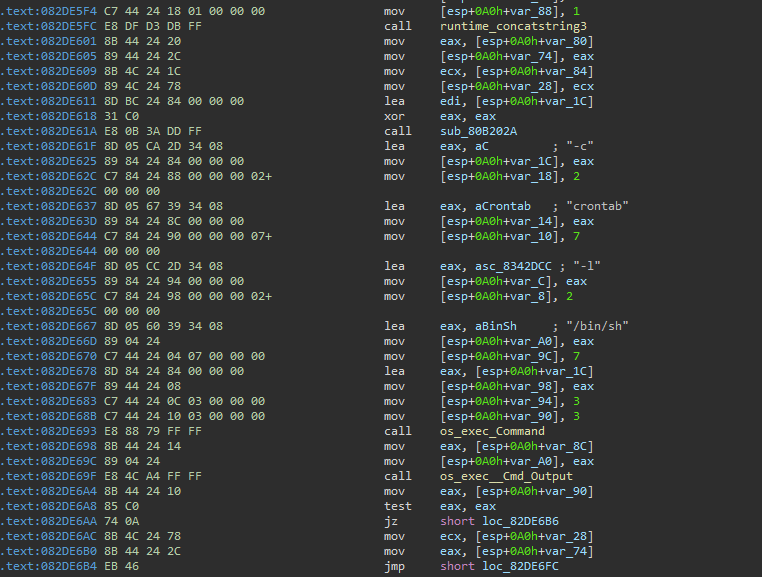
Figure 04: Sample of code demonstrating the process to create a crontab entry
The process begins by creating a file named “cron.txt” in the current working directory, which contains an entry pointing to the malware’s file path.
@reboot <gomir_process_file_path>
Next, the malware attempts to list all existing crontab entries on the compromised host by executing the following command:
/bin/sh -c crontab -l
The output of this command, which lists the current crontab entries, is appended to the “cron.txt” file. Finally, the malware updates the crontab configuration by executing the following crontab command:
/bin/sh -c crontab cron.txt
Figure 05 shows the value of the existing crontab to our test lab after we execute Linux.Gomir with higher privilege.

Figure 05: list crontab
Install Services
To maintain persistence and ensure execution with elevated privileges upon reboot, Linux.Gomir installs itself as a system service. Initially, it copies its executable to the “/var/log/syslogd” directory. Following this, it creates a service configuration file named “syslogd.service” in the “/etc/systemd/system/” directory. This service file is configured to point to the copied malware executable in “/var/log/syslogd,” effectively setting up the malware to run as a system service.
Lastly, to make sure that the service will smoothly install on the compromised host, it will enable and start the created service file using the following command:
/bin/sh -c systemctl daemon-reload
/bin/sh -c systemctl reenable syslogd
/bin/sh -c systemctl start syslogd
Figure 06 contains screenshots of the code demonstrating how this malware executes the described technique.
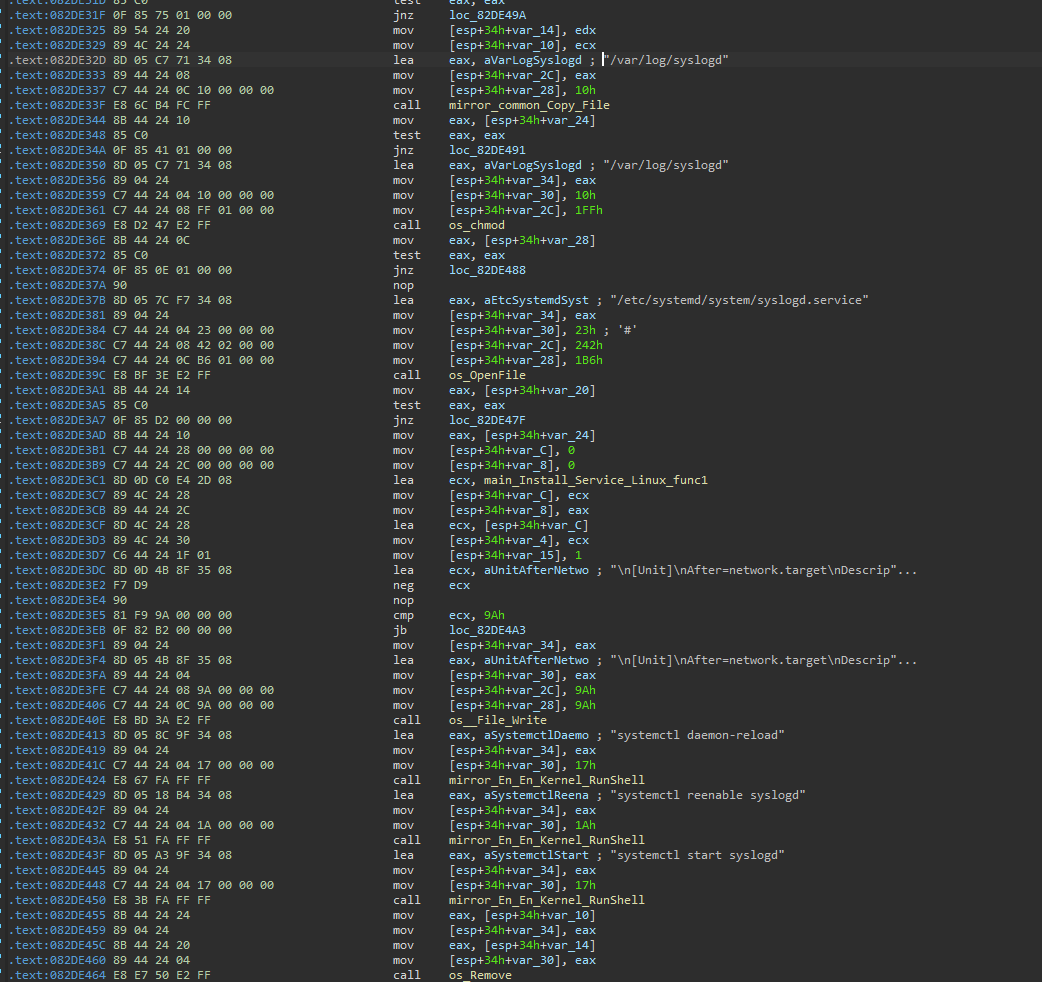
Figure 06: Sample of code used to execute the install services technique
Figure 07 shows the content of the .service file created by this malware for the copy of itself named as “syslogd”.
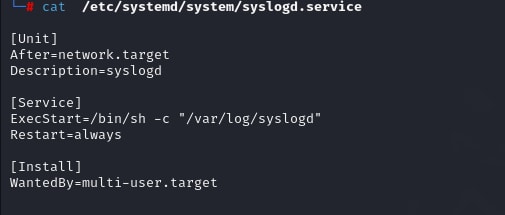
Figure 07: Content of .service file
Command and Control (TA0011)
Finally, the malware executes a function responsible for communicating with its C2 server. Unfortunately, the C2 server was already down at the time of writing. This function decrypts incoming commands from the server and encrypts the results of the operations performed on the compromised host.
Figure 08 displays a brief snippet of the function code that processes operations after decoding and decrypting its backdoor commands. The shown code snippet pertains to three backdoor operations that retrieve the process’s current working directory, get the directory size and collect system information such as CPU details, memory statistics, and network information.
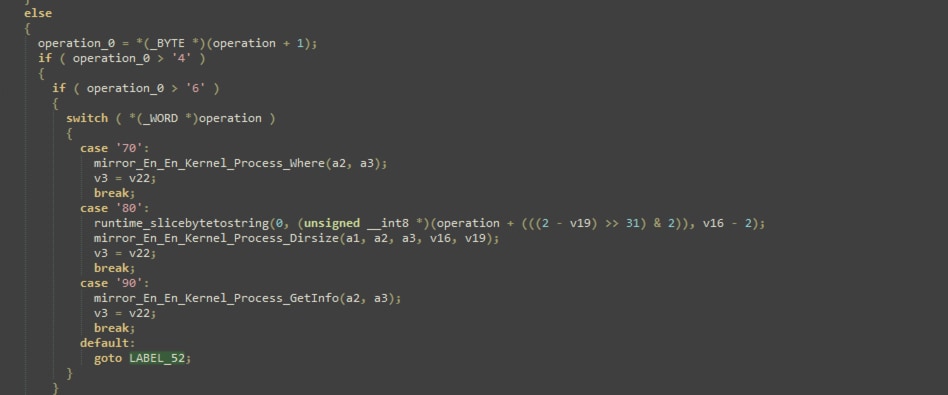
Figure 08: Part of Backdoor Function
Below are the activities we observed the three backdoor operations execute:
- Start reverse proxy client
- Upload socket list information to the C2 server
- Hibernate the Gomir client at a specific date, time, and location
- Return the command path of the Gomir client process
- Return the code page of the Gomir client process
- Return the current file path of the process
- Return the size of the targeted directory from the compromised host
- Retrieve system information such as hostname, username, CPU details, memory statistics, and network information (interface, names, addresses)
- Set up a TCP connection
- Kill or exit a process
- Retrieve the current working directory of the Gomir client process
- Change the current working directory
- Put the Gomir client to sleep
- Execute shell commands
Detecting Linux.Gomir with Splunk Security Content
By understanding Linux.Gomir’s behaviors, the Splunk Threat Research Team was able to generate telemetry and datasets to develop detections designed to help defend and respond against this threat. You can find these detections below, and for our full repository of security detections, visit research.splunk.com.
Linux Adding Crontab Using List Parameter
The following analytic identifies suspicious modifications to cron jobs on Linux systems using the crontab command with list parameters. This command line parameter can be abused by adversaries to add a crontab entry for executing their malicious code on a schedule of their choice. However, it’s important to note that administrators or normal users may also use this command for legitimate automation purposes, so filtering is required to minimize false positives. Identifying the modification of cron jobs using list parameters is valuable for a SOC, as it indicates potential malicious activity or an attempt to establish persistence on the system.
| tstats `security_content_summariesonly` count min(_time) as firstTime max(_time)
  as lastTime from datamodel=Endpoint.Processes where Processes.process_name = "crontab"
  Processes.process= "* -l*" by  Processes.parent_process_name Processes.process_name
  Processes.process Processes.process_id Processes.parent_process_id Processes.dest
  Processes.user | `drop_dm_object_name(Processes)` | `security_content_ctime(firstTime)`
  | `security_content_ctime(lastTime)` | `linux_adding_crontab_using_list_parameter_filter`

Figure 09: Detection for adding Crontab
Linux Service Restarted
The following analytic detects the restarting or re-enabling of services in the Linux platform. It focuses on the use of systemctl or service tools for executing these actions. Adversaries may leverage this technique to repeatedly execute malicious payloads as a form of persistence. Linux hosts typically start services during boot to perform background system functions. However, administrators may also create legitimate services for specific tools or applications as part of task automation. In such cases, it is recommended to verify the service path of the registered script or executable and identify the creator of the service for further validation.
| tstats `security_content_summariesonly` count min(_time) as firstTime max(_time)
  as lastTime from datamodel=Endpoint.Processes where (Processes.process_name IN ("systemctl",  "service") OR Processes.process IN ("*systemctl *", "*service *")) Processes.process  IN ("*restart*", "*reload*", "*reenable*") by Processes.dest Processes.user
Processes.parent_process_name
  Processes.process_name Processes.process Processes.process_id Processes.parent_process_id  Processes.process_guid | `drop_dm_object_name(Processes)` | `security_content_ctime(firstTime)`  | `security_content_ctime(lastTime)` | `linux_service_restarted_filter`

Figure 10: Detection for Service Restarted
Linux Service Started Or Enabled
The following analytic detects the creation or enabling of services in Linux platforms, specifically using the systemctl or service tool application. This behavior is worth identifying as adversaries may create or modify services to execute malicious payloads as part of persistence. Legitimate services created by administrators for automation purposes may also trigger this analytic, so it is important to update the filter macros to remove false positives.
| tstats `security_content_summariesonly` count min(_time) as firstTime max(_time)
  as lastTime from datamodel=Endpoint.Processes where (Processes.process_name IN ("systemctl",  "service") OR Processes.process IN ("*systemctl *", "*service *")) Processes.process  IN ("* start *", "* enable *") AND NOT (Processes.os="Microsoft Windows" OR
Processes.vendor_product="Microsoft Windows")
   by Processes.dest Processes.user Processes.parent_process_name  Processes.process_name Processes.process Processes.process_id Processes.parent_process_id  Processes.process_guid | `drop_dm_object_name(Processes)` | `security_content_ctime(firstTime)`  | `security_content_ctime(lastTime)` | `linux_service_started_or_enabled_filter`

Figure 11: Detection for Service Started/Enable
Linux Service File Created In Systemd Directory
The following analytic is designed to detect suspicious file creation within the “systemd” timer directory on Linux platforms. Malicious actors can exploit this feature by embedding a “systemd” service file for persistence on the targeted or compromised host.
| tstats `security_content_summariesonly` count min(_time) as firstTime max(_time)
  as lastTime FROM datamodel=Endpoint.Filesystem where Filesystem.file_name = *.service  Filesystem.file_path IN ("*/etc/systemd/system*", "*/lib/systemd/system*",
"*/usr/lib/systemd/system*",
  "*/run/systemd/system*", "*~/.config/systemd/*",
"*~/.local/share/systemd/*","*/etc/systemd/user*",
  "*/lib/systemd/user*", "*/usr/lib/systemd/user*", "*/run/systemd/user*") by Filesystem.dest  Filesystem.file_create_time Filesystem.file_name Filesystem.process_guid Filesystem.file_path  | `drop_dm_object_name(Filesystem)` | `security_content_ctime(lastTime)` | `security_content_ctime(firstTime)`
  | `linux_service_file_created_in_systemd_directory_filter`'
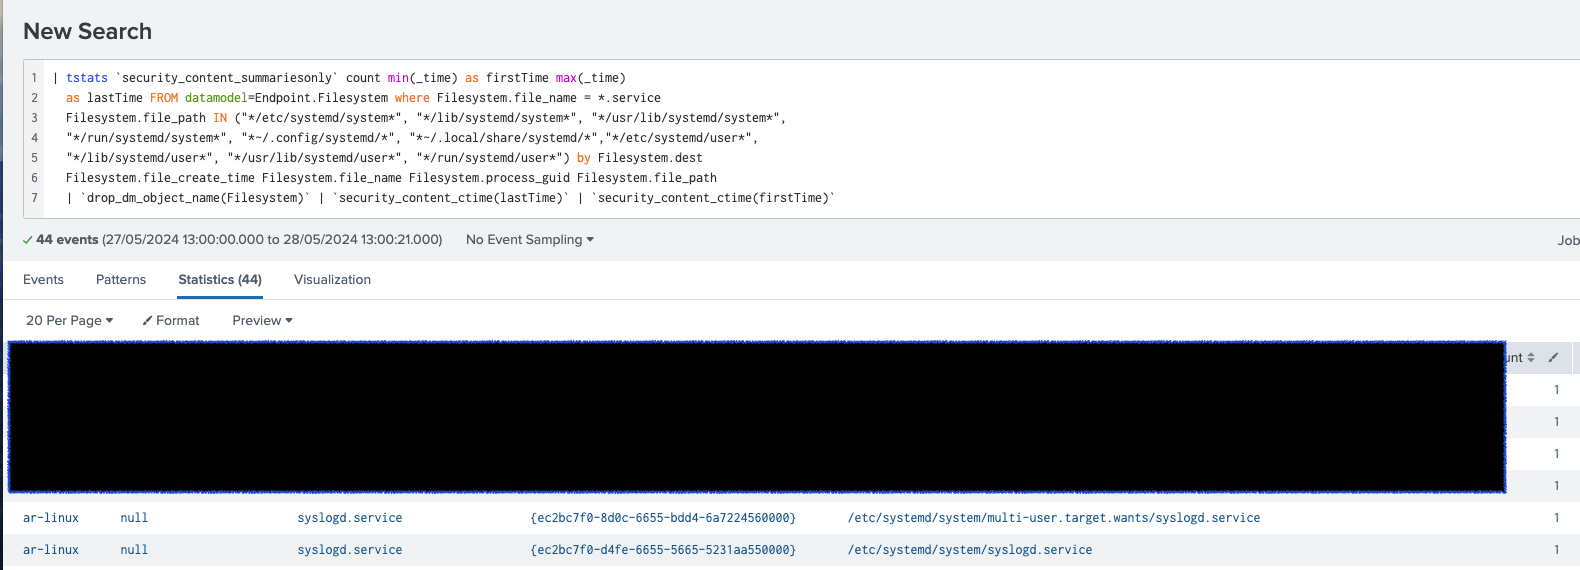
Figure 12: Detection for Created Services
Atomic Tests for Simulating Linux.Gomir
As defenders of our organization, it is essential to test the effectiveness of our defenses, including analytics, XDR, and antivirus products. This ensures they are properly configured and capable of detecting notable Linux.Gomir TTPs. In this section, we will guide you through the process of testing your detections using Atomic Red Team. These tools will help you validate and fine-tune your security measures to enhance your organization’s resilience against threats.
IOC
| hash | description |
| 30584f13c0a9d0c86562c803de350432d5a0607a06b24481ad4d92cdf7288213 | Gomir |
Learn More
This blog helps security analysts, blue teamers and Splunk customers identify Linux.Gomir malware by enabling the community to discover related TTPs used by threat actors and adversaries. You can implement the detections in this blog using the Enterprise Security Content Updates app or the Splunk Security Essentials app. To view the Splunk Threat Research Team’s complete security content repository, visit research.splunk.com.
Contributors
We would like to thank Teoderick Contreras for authoring this post and the entire Splunk Threat Research Team for their contributions.