When, what and why
As a national CERT we analyse all kinds of incidents. Some of them involve
widespread APT campaigns,
othertimes we just focus on everyday threats. Recently we got notified about a new malspam campaign targeting Polish users and decided to investigate.
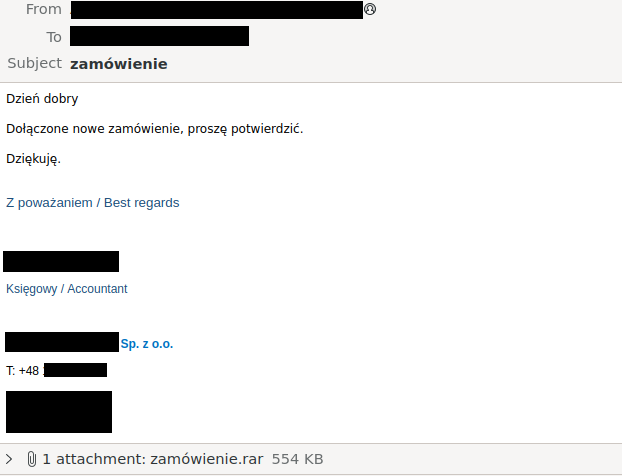
It all started with this phishing email:

The phishing email is not very unusual by itself, but it was interesting for us for a few reasons:
- Initial email was sent from a legitimate employee account of a Polish company (using stolen credentials).
- A Polish C2 server was used .
- Email had no obvious grammatical errors and looked relatively professional.
- Our tooling didn’t handle it very well, and we were not able to extract the payload automatically.
We quickly realised that the payload is not too exciting – dynamic analysis revealed that
the behaviour is consistent with AgentTesla, a ubiquitous .NET stealer.
But we decided to dig deeper, and it turned out that the campaign is quite interesting from
a technical point of view, and a good opportunity for us to work on our tools.
Because of that, this post will mostly focus on the malware analysis aspect.
Stage 1 – the email and the dropper
The phishing email contained information about some order, and asked for a confirmation. Of course it also had an attachment called zamowienie.rar (order.rar in Polish), with a zamowienie.exe file inside.
The first sample – zamowienie.exe file – is a simple dropper written in .NET. Interestingly,
it’s written as a WPF application which is a bit unusual. WPF is quite a heavy-weight framework for desktop GUI
applications, so using it for a (headless) malware dropper is very wasteful. We speculate it was done
to confuse antimalware engines with a lot of API calls (done by the WPF framework during startup).
The code was not obfuscated or encrypted, so it was easy to spot the payload decryption:
private static byte[] Decrypt(byte[] input)
{
    return MainWindow.PerformDecryption(MainWindow.CreateDecryptor(Convert.FromBase64String("XB2j5Gwv6ftrYs+yaekTzGNhODnSNZkbIG+wsxT7wMI=")), input);
}
Payload is encrypted with AES in ECB mode, so decryption is trivial with Python:
from malduck import aes, base64

plain = aes.ecb.decrypt(base64(key), assembly)
open(sys.argv[2], "wb").write(plain)
But we have to extract the payload and key first. It’s very easy to do manually, but we decided to
automate it as an investment in our .NET tooling (which is currently lacking). We used
the wonderful dnlib, because we wanted to stick to Python (and most of the .NET tooling is written
in .NET itself). It turned out to be a great decision – unpacking script was just 50 lines of code, and
the important part (after cleaning up a bit) is just:
from dnlib.DotNet import ModuleDef, ModuleDefMD
from dnlib.DotNet.Emit import OpCodes
from dnlib.DotNet.Resources import ResourceReader

def get_assembly_init(instructions):
    for insn in instructions:
        if insn.OpCode == OpCodes.Ldtoken:
            return insn.Operand.InitialValue

def get_key_init(instructions):
    for insn in instructions:
        if insn.OpCode == OpCodes.Ldstr:
            return insn.Operand

modctx = ModuleDef.CreateModuleContext()
module = ModuleDefMD.Load(sys.argv[1], modctx)

type_with_assembly = [x for x in module.GetTypes() if x.Name.Contains("LoadDD")][0]
method_with_assembly = [x for x in type_with_assembly.Methods if x.Name == "MoveNext"][0]
assembly = get_assembly_init(method_with_assembly.Body.Instructions)
print(f"assembly: {len(assembly)} bytes")

type_with_key = [x for x in module.GetTypes() if x.Name.Contains("MainWindow")][0]
method_with_key = [x for x in type_with_key.Methods if x.Name == "Decrypt"][0]
key = get_key_init(method_with_key.Body.Instructions)
print(f"key: {key}")
Who knows, maybe this piece of code will evolve into a feature of malduck
or a karton-config-extractor extension.
For now, let’s focus on the main challenge: the packer.
Stage 2 – the packer
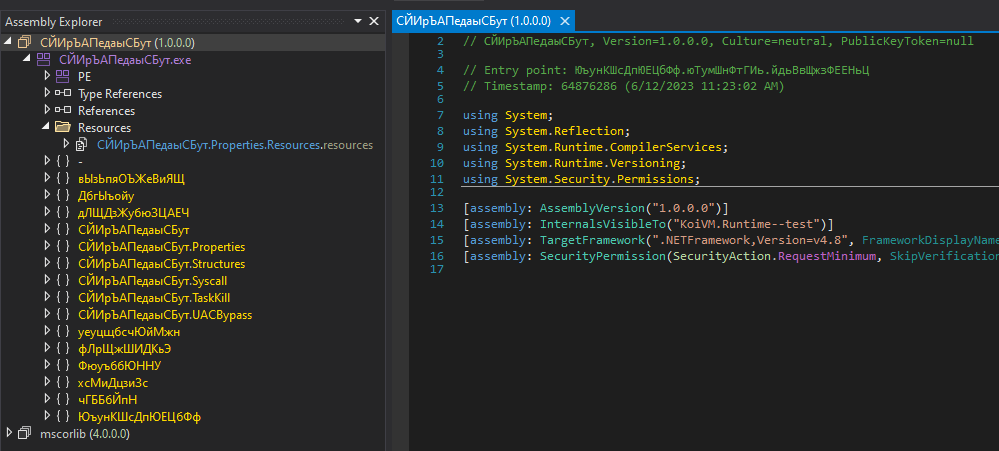
This is what we saw after opening the sample in dnspy (a popular .net decompiler):

We immediately noticed a few things:
- All the names are changed to random Cyrillic characters (the characters are random – the words don’t make sense).
- The sample contains a resource called
DONALDTRUMP, which likely contains the embedded payload. - There is no useful code to speak of, because everything was packed by some tool (called
CryptoObfuscator 1.0according to embedded attributes), with KoiVM under the hood. - The tool is called DotRunpeX, or, according to the embedded product name,
RunpeX.Stub.Framework.
The packer is, unfortunately, quite advanced. That’s because the heavy lifting is done by KoiVM virtualizer –
a complex protector capable of heavily obfuscating .NET code behaviour. The usual tool of choice
in this case is a unpacker called OldRod, but it only works for unmodified
KoiVM. Unfortunately, the KoiVM packer used in the sample was modified so the vanilla OldRod didn’t work
(namely, the constant table was not initialized in a way that OldRod expected). This means that we were stuck
with an obfuscated “virtual machine”, with no easy way to get the payload.
But we didn’t give up, of course. Before jumping straight into implementation we’ve decided to check the
internet for clues. Fortunately for us, we’ve found
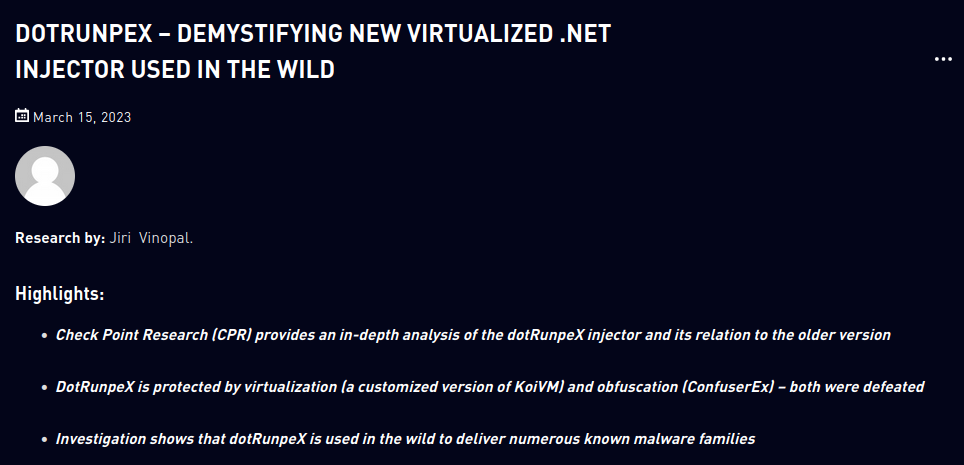
this great blog post by Checkpoint Research’s Jiri Vinopal:

The blog post is definitely worth a read. The first stage described in the blog post was significantly different
(as was their method of extraction), but the second state looks extremely similar. We hoped to find a way to
unpack our samples there, unfortunately:

The rest of the blog post describes a novel way of extracting the samples using a mixed native and managed dynamic
instrumentation. It was capable of extracting dotRunPeX configuration (as a list of unformatted strings). But since we
were interested in extracting the embedded payload directly, we decided to dig deeper and implement our own solution
instead.
Since the resource is encrypted, our educated guess was that it uses the same encryption algorithm as the first stage –
AES in ECB mode. The only thing we were missing was a key.
As mentioned before, KoiVM is well, a VM. The code is reimplemented in terms of VM opcodes executed by the runtime.
One of the opcodes is responsible for calling functions. If our assumption is correct, one of the invocations will
eventually be an AES decryption function call, along with a correct decryption key and the payload. We just have to find
the method call opcode. It’s pretty easy with dnSpy – we can find a MethodBase in the list of types referenced by
the assembly, and search (analyse) for all Invoke calls:

This will bring us to the Invoke() call in the assembly:

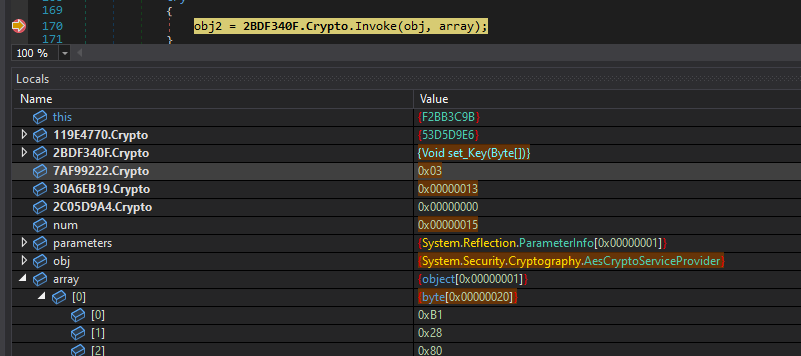
At this point we can add a breakpoint there and press “continue” until we find something interesting. But it’ll take a
long time. Fortunately, we can set a conditional breakpoint instead. For example, since we expect that
at some point AES decryption will be initiated, we can simplify our work and set a breakpoint using the following
condition:
obj != null && obj.GetType().ToString() == "System.Security.Cryptography.AesCryptoServiceProvider"
This lets us stop the execution at a perfect moment:

Armed with the key, unpacking the resource is trivial:
from malduck import aes, base64

key = base64("7p8VEuPbMQJ/2vi54zDoaEDRswUQt9l5D92uQ659O/0=")
data = open("DONALDTRUMP", "rb").read()
plain = aes.ecb.decrypt(key, data)
open("payload", "wb").write(plain)
And we have a third stage – the final payload!
This method is quite simple and it works, but it would take a lot of time to do at scale.
Also we like to automate our tools as much as possible, so we decided to find a way to extract the
payload dynamically.
Since we already had a simple algorithm (set a breakpoint, run the binary, dump the key or payload), it
should be simple to automate it, right? Unfortunately, it turned out that .NET debugger automation is a very
poorly researched topic. We didn’t find any debugger library for .NET, and the debuggers we’ve found either
didn’t work, or were not easy to automate. We’ve tested, among others:
dnSpy– known-working tool for our samples, but automation is not possible. We’ve tried to rewrite the GUI to make it automatable but failed badly (UI state and low-level debugging code are too tightly knit with each other).mdbg– extremely old PoC/example code, didn’t work on our samples- Mono’s
sdbg– focused on Linux and Mono, not obvious it would work with our malware at all, we had problems running it netcoredbg– looked good, but focuses on .NET core and doesn’t work for our samplesdotnetdebug– worked! But it’s a code injection PoC that uses debugger API, not a debugger. And it’s written in C++, so rewriting it would be too costly for us. But we’ve successfully tested breakpoints using it.mindbg– didn’t work. But was very promising so we decided to investigate more, and found the flaw in the original code.
In fact, we decided to use mindbg as a base for our own project
called dbglib – which we proudly share on GitHub today.
It’s currently a PoC with support for just the subset of
debugging API that we needed, but hopefully it’ll save some frustration for another researcher.
With dbglib, instrumenting a .NET sample is as simple as subclassing ManagedCallback class and implementing
necessary callbacks. In our case we just need to hook LoadModule and Breakpoint:
public class UnpackerCallback : ManagedCallback {
    string filename;

    public UnpackerCallback(string filename) {
        this.filename = filename;
    }

    public override void Breakpoint(ICorDebugAppDomain pAppDomain, ICorDebugThread pThread, ICorDebugBreakpoint pBreakpoint) {
        Console.WriteLine("Breakpoint hit!");
        ICorDebugValue value = pThread.GetActiveFrame().GetILFrame().GetArgument(0);
        string keyCandidate = value.AsString().GetStringValue();
        Console.WriteLine("Parameter: {0}", keyCandidate);
        if (keyCandidate.EndsWith("=")) {
            File.WriteAllText(filename + ".key.txt", keyCandidate);
            pAppDomain.GetProcess().Terminate(0);
            Process.GetCurrentProcess().Kill();
        }
        base.Breakpoint(pAppDomain, pThread, pBreakpoint);
    }

    public override void LoadModule(ICorDebugAppDomain pAppDomain, ICorDebugModule pModule) {
        var func = pModule.ResolveFunction("System.Convert", "FromBase64String");
        if (func != null) {
            Console.WriteLine("Time to add my breakpoint, found {0}!", func);
            func.CreateBreakpoint();
            Console.WriteLine("Ok, hopefully done.");
        }
        base.LoadModule(pAppDomain, pModule);
    }
}
And then we have to run the sample and wait for completion (with a 20 second timeout, in our case):
static void Main(string[] args) {
    var callback = new UnpackerCallback(args[0]);
    var debugger = DebuggerManager.Create(callback);
    debugger.CreateProcess(args[0]);
    for (int i = 0; i < 20; i++) {
        Console.WriteLine("waiting {0}...", i);
        Thread.Sleep(1000);
    }
}
Running this program produces a config in a few seconds:

This method worked almost flawlessly – on our sample corpus a small percentage of samples
didn’t unpack correctly because they crashed immediately after running –
the most likely reason is that they require additional command line flags or
environment configuration.
Stage 3 – the payload and the campaign
Finally we got our hands on the payload. It was – as expected – a typical AgentTesla
sample, but our automated pipeline wasn’t
able to extract it. Fortunately, we were able to fix our extractors in just a few minutes, by
deploying a simple fix to our Yara rule – but this feat wouldn’t be possible if we didn’t
extract the previous layers manually:

This, in turn allowed us to find more fresh AgentTesla samples, and (together with another
fix) get a better visibility into the stealer landscape again.
We also wrote a few Yara rules to detect samples packed with this packer in the future, to
improve our detection capabilities and find similar future regressions in our automation:
rule certpl_dotrunpex_stage1
{
    meta:
        description = "Stage1 packer of dotrunpex samples"
        author = "msm"
        date = "2023-09-02"
    strings:
        $aes = "CreateAesInstance"
    condition:
        all of them
}

rule certpl_dotrunpex
{
    meta:
        description = "Dotrunpex sample"
        author = "msm"
        date = "2023-09-02"
    strings:
        $fish = "Fish" wide
        $koivm = "KoiVM.Runtime--test"
        $runpexstub = "RunpeX.Stub.Framework" wide
    condition:
        2 of them
}
After unpacking the samples we obtained from our initial VT hunt, we encountered the following payloads (ordered by popularity):
- AgentTesla (almost 50% of samples)
- Asyncrat
- Formbook
- Lumma
- Remcos
- Others (lokibot, QuasarRat, redline, unidentified samples)
This suggests that this packer is used quite broadly by various groups to obfuscate their payloads.
Hashes:
0638cb06ec16ea6cabffdffb8fa29608f8daee68886fb617495a96d0dcdf83e5 zamowienie.rar
743d2d7eca252cf2b19c0355d645018de71cd4c3443592ebbccbb839192230bd zamowienie.exe (dropper)
6f7e6f123333920e6a59cf6585d19dae2236f42b27b24557d0e1d0e675f52e7e stage2 (packer)
521e9d3bc1517804c3e2b651fc5e64742dcd88d780578b06f57fbdff4f48174d payload (agenttesla)
Source: https://cert.pl/en/posts/2023/09/unpacking-whats-packed-dotrunpex/